

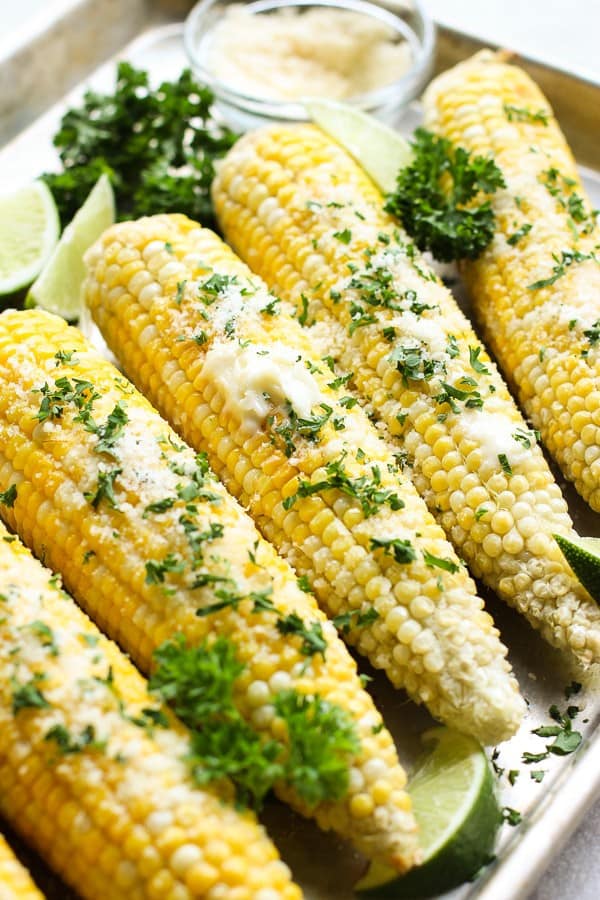
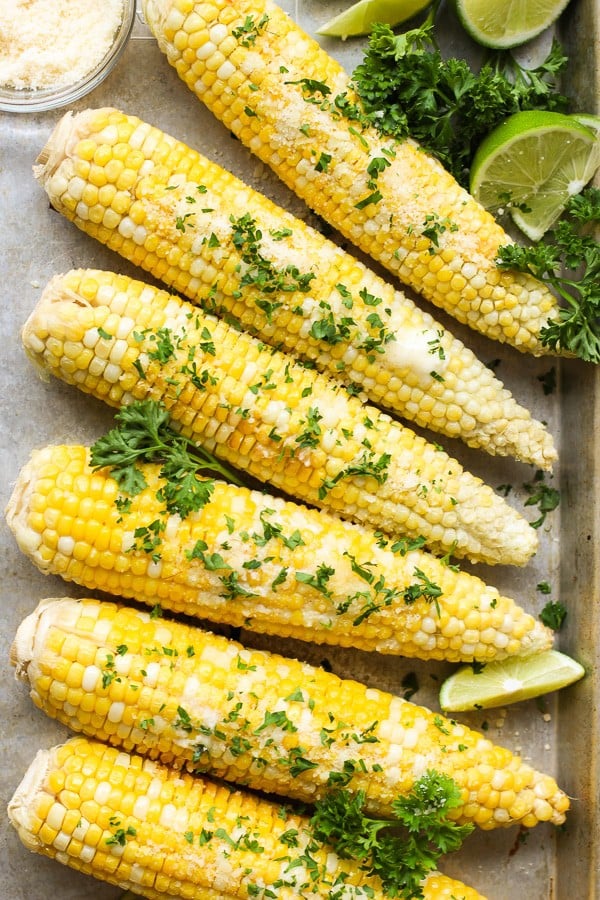
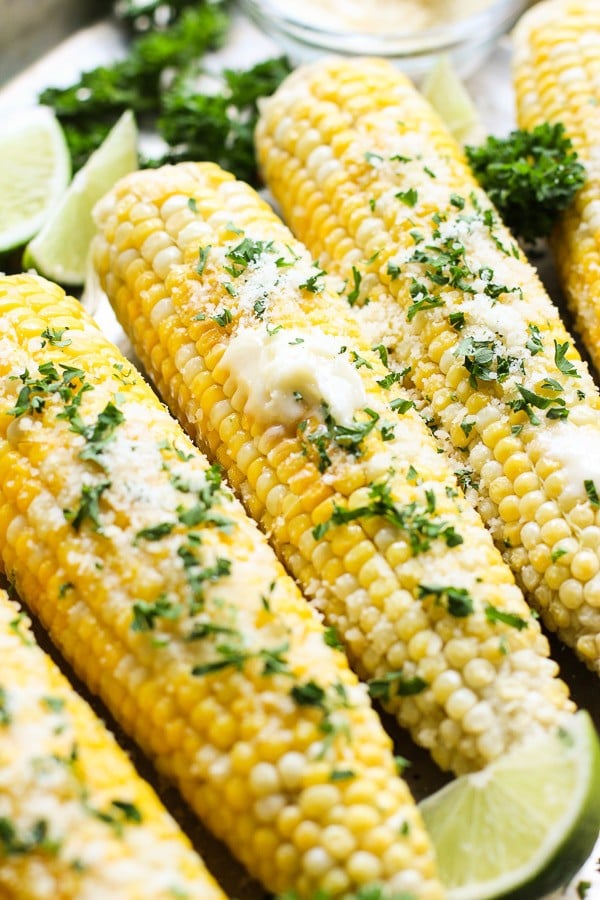
Oven Roasted Corn on the Cob is the perfect side dish for cookouts, dinners and parties. Yes – you really can make incredible baked corn on the cob right in the oven!
If you’ve been wondering how to roast corn in the oven, this is your sign: it’s an easy, mess-free way to cook corn while preserving all its amazing flavors. This roasted corn is smothered with butter, parmesan cheese and fresh parsley, but I also share more ways to make this!
Love corn recipes? Don’t forget to also check these out: Skillet Corn with Bacon, Chipotle Copycat Corn Salsa, and Flank Steak with Avocado Corn Topping.
Why Oven Roasted Corn on the Cob?
As far as corn is concerned, as long as it is juicy, sweet fresh corn, I am open to any method of cooking – boiling, steaming, grilling, or oven roasted. I have done it all, and they all totally work.
I am, however, slightly partial to oven roasted corn on the cob just because of the ease of it for everything from preparation to clean up, and I love the flavors of baked corn!
While I love grilling corn on the grill, when I have to grill a ton of meats and hamburgers, I don’t have the space for my corn and veggies. It’s a lot easier and just as yummy to oven bake the corn on the cob and get it going while the meats are cooking.
Why I like oven roasted or oven baked corn on the cob:
- Easy cleanup: line pan with aluminum foil and throw away foil when you are done oven roasting corn on the cob.
- No boiling water involved: I cannot tell you how much I dislike dealing with boiling water and trying to dump boiling water.
- Maintains flavor and nutrients: unlike boiling in water, we will not lose any of its flavor and nutrients.
- Maintains crispness: it’s harder to turn corn on the cob mushy if it accidentally gets baked longer than intended.
- Simple: Bring it into the oven to cook, flip halfway, and then it’s done! Corn is ready! Best of all, you don’t have to watch oven roasted corn on the cob while it is cooking.
Ingredients
Here’s what you’ll need to make this oven roasted corn on the cob. Just a handful of simple ingredients pulled straight from the fridge and pantry:
- Corn on the cob: Fresh, in-season corn works best. Look for bright green husks and plump, tightly packed kernels. Avoid frozen corn if possible.
- Salted butter: Coats the corn so it roasts up golden and flavorful. Unsalted butter, or other neutral oil such as olive oil, avocado oil etc works too, just add a touch more salt to taste.
- Parmesan cheese: Freshly grated melts onto the warm corn best, though the pre-grated kind works in a pinch.
- Fresh parsley: Adds a pop of color and a little herby freshness once the corn comes out of the oven.
- Salt: Optional, but a simple finishing touch if you want a more classic, unfussy flavor.
- Lime: Also optional, a squeeze of fresh lime juice brightens up the butter and parmesan.
How to Bake Corn in the oven
Now that I’ve hopefully convinced you that oven roasted corn on the cob is the way to go, here’s exactly how to roast corn in the oven – step by step.
Step 1: Prep the corn
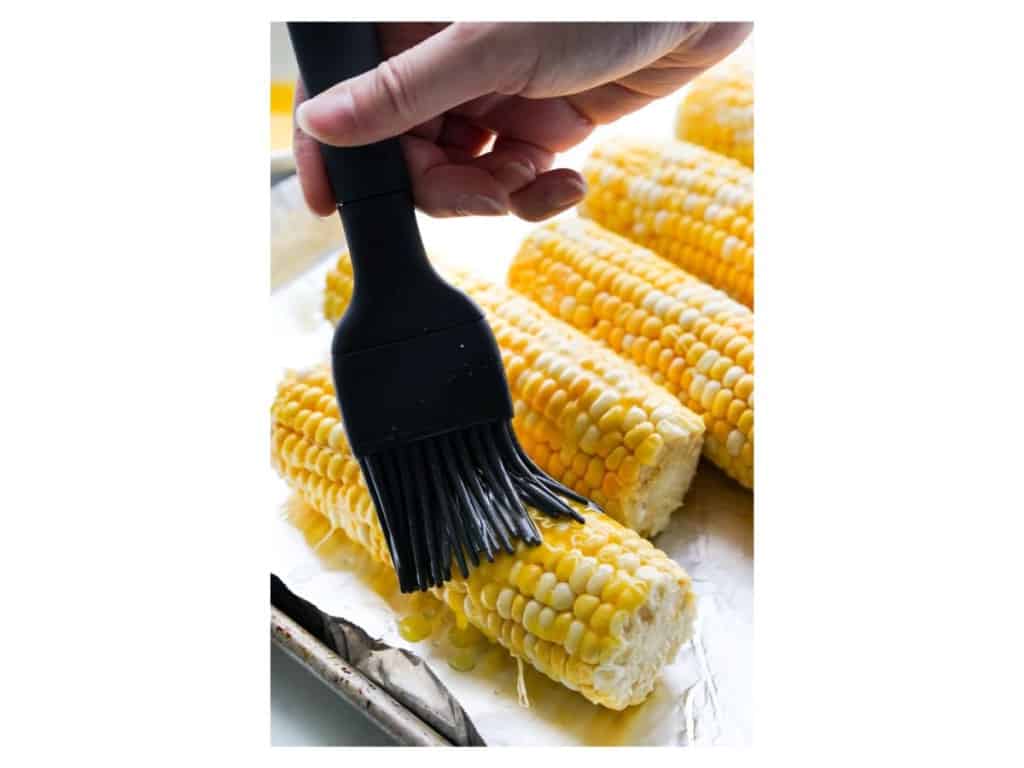
Remove the husk and silk from each ear of corn. Line a baking sheet with aluminum foil for easy cleanup, then place the peeled corn directly onto the foil.
Brush melted butter all over each cob so every side gets coated.
Step 2: Position the rack and bake
Position your oven rack in the center of the oven before you preheat – this puts the corn right in the middle of the heat, so it roasts evenly instead of browning too fast on top or bottom. Bake the corn at 400°F for 15 minutes.
Step 3: Flip and finish baking
Halfway through baking, flip the corn so the other side gets its turn in the heat. Bake for another 15-20 minutes, or until the corn is fully cooked on all sides.
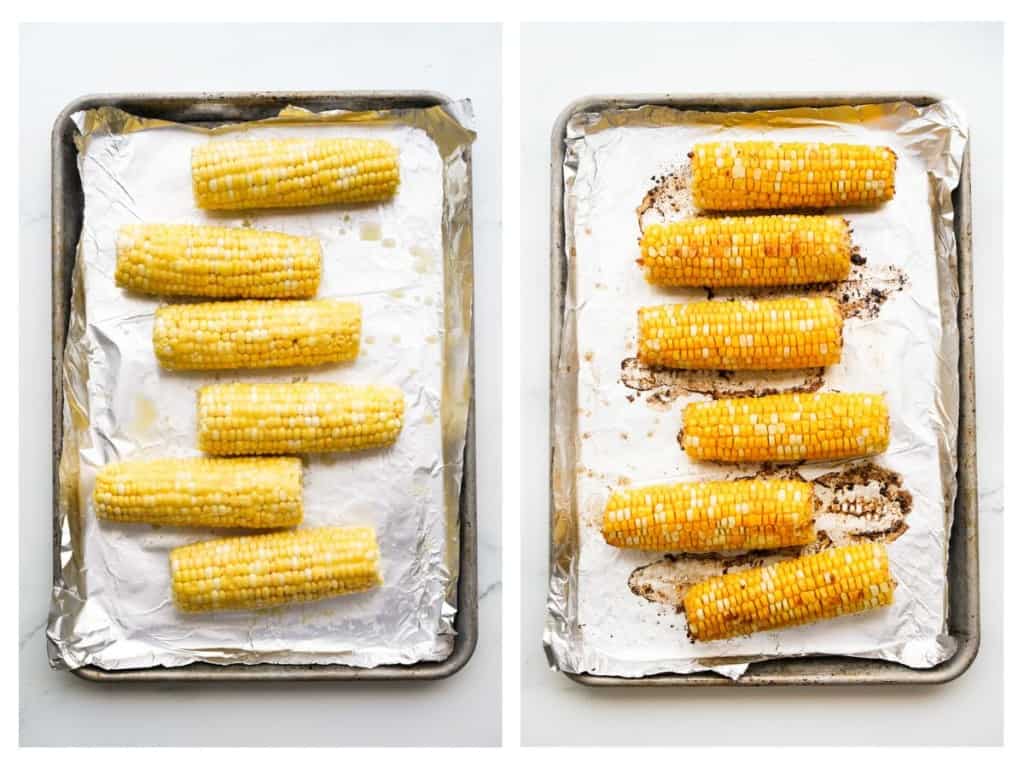
How to tell when the corn is done? Look for kernels that have turned a deeper, more golden yellow color and feel plump and juicy – not shriveled or dull. The kernels should look glossy rather than dry.
If a few kernels near the center of the cob still look pale or feel firm, give the corn another 5 minutes in the oven and check again – oven hot spots, corn size, and altitude can all affect exact timing.
Step 4: Dress and Serve
Once the corn is done, dress your oven roasted corn on the cob by sprinkling with grated parmesan cheese and chopped fresh parsley. Or keep it simple with just a sprinkle of salt for classic roasted corn flavor!
Variations And Substitutions For Baked Corn
Parmesan herb butter is my favorite way to dress oven roasted corn on the cob, but there are so many other ways to season baked corn. Here are a few of my favorite spins:
- Serve it plain! Especially when it is peak corn season, corn will be sweet and juicy and you may not need to dress it at all!
- Mexican street corn style: Brush with mayo and a little lime juice, then sprinkle with cotija cheese, chili powder, and cilantro for an elote-inspired twist.
- Garlic herb butter: Stir minced garlic and Italian seasoning or fresh herbs like thyme and rosemary into the melted butter before brushing it onto the corn.
- Spicy honey butter: Mix a drizzle of honey and a pinch of cayenne or chili flakes into the butter for sweet heat.
- Everything bagel seasoning: Skip the parmesan and parsley and sprinkle everything bagel seasoning over the buttered corn instead.
- Cajun spiced corn: Season the buttered corn with cajun or creole seasoning for a smoky, spicy kick.
- Dairy-free: Swap the butter for olive oil or a dairy-free butter substitute, and use nutritional yeast in place of parmesan.
- Unsalted butter: If you only have unsalted butter on hand, that works too – just add a little extra salt to taste.
Storing and Reheating
To store leftover baked corn on the cob, let it cool to room temperature, then store in an airtight container for up to 5 days.
To reheat corn on the cob, bake in the oven for 10-15 minutes at 325℉, flipping halfway through. You can also reheat oven roasted corn on the cob in the microwave.
How to Serve This
Oven roasted corn on the cob is a staple side dish for summer cookouts and bbq’s. It goes great with almost all grilling recipes, such as:
Tips And Tricks For The Best Roasted Corn
A few extra tips to make sure your oven roasted corn on the cob turns out perfectly every time:
- Choose fresh, in-season corn: Look for bright green, tightly wrapped husks and plump, well-formed kernels for the sweetest, juiciest results.
- Pat the corn dry: If your corn is damp, pat it dry with a paper towel before brushing on butter so the butter sticks evenly instead of sliding off.
- Don’t skip the center oven rack: Placing your rack in the center of the oven helps the corn roast evenly on all sides. If the rack is too high, it might burn the corn.
- Use a rimmed baking sheet: A rimmed baking sheet catches any melted butter that drips off the corn, which keeps your oven clean.
- Line with foil for easy cleanup: Foil makes for quick cleanup and helps keep the corn from sticking to the pan.
- Don’t overcrowd the pan: Leave a little space between each ear of corn so hot air can circulate and everything cooks evenly.
- Flip halfway through: Turning the corn partway through baking helps it cook and brown evenly on all sides.
- Season right after baking: Add parmesan cheese, herbs, or other toppings while the corn is still hot so they melt and stick better.
- Check both ends, not just the middle: The tips of the cob can cook a little slower than the center, so check doneness there too.
- Make extra: Oven roasted corn on the cob reheats well, so it’s worth roasting a few extra ears for leftovers.
Frequently Asked Questions
Yes you can, but it will not be as crisp and fresh. Bring it to a complete defrost and pat dry to remove excess moisture before following my recipe instructions.
Bake corn on the cob longer if needed. There are so many factors that could affect this – oven temperatures, size of corn, altitude etc. Feel free to also rotate corn another time and baking for longer in the oven as needed.
Yes! Bake it for 400℉ for 30-35 minutes, rotating once halfway. When done, remove husk and brush melted butter and other toppings all over.
Corn will turn a more intense yellow color, and kernels will be plump and juicy.
You don’t need to wrap the corn itself in foil for this recipe. The foil is just lining the pan for easy cleanup, while the corn sits directly on top and uncovered. Leaving it uncovered lets the direct oven heat roast the kernels and gives you that slightly caramelized flavor. If you wrap each ear in foil instead, the corn will steam rather than roast, which gives you a softer texture closer to boiled corn.
No, soaking isn’t necessary here. Soaking is more common when grilling corn in the husk to keep it from burning, but since this recipe bakes peeled corn directly, there’s no need to soak it first.
Corn on the cob tastes best fresh out of the oven, but you can roast it ahead and reheat it (see the Storing and Reheating section above) if you’re prepping for a cookout or gathering.
Cotija, feta, or nutritional yeast (for a dairy-free option) all work well. See the Variations and Substitutions section above for more ideas.
This usually comes down to the corn itself being past its peak freshness, not the baking. Look for corn with bright green husks and plump kernels for the best texture.
Yes! Just make sure the corn stays in a single layer without overcrowding the pan so it roasts evenly – you may need a second baking sheet or to bake in batches.
ENJOYED THIS RECIPE? Tell us what you think by leaving a rating and review below! 🤍
Other Yummy Sides for the Summer
- Fruit Salad with Honey Lime Dressing
- Loaded Baked Potato Salad
- Light Raisin Coleslaw
- Kale and Brussels Sprouts Salad
- Grilled Fingerling Potatoes with Bacon Vinaigrette
- Broccoli Kale Apple Cranberry Slaw
- Bow Tie Pasta Salad
- Tomato Feta Salad (by my blogger friend, Edyta from Eating European)
Oven Roasted Corn on the Cob
Equipment
Ingredients
- 6 corn on the cob
- 3-4 tbsp salted butter
- 2-3 tbsp parmesan cheese grated
- 1-2 tbsp fresh chopped parsley
- salt to taste and optional
- 1 small lime optional
Instructions
- Pre-heat oven to 400°F
- Peel husk from fresh corn.
- Melt butter (if butter is hard) and brush butter onto all sides of the corn. Then place corn onto baking sheet line with aluminum foil (for easy cleanup).
- Bake in the oven for 15 minutes, then turn corn so that the other side is cooked.
- Bake for another 15-20 minutes, or until corn is fully cooked on all sides.
- Sprinkle parmesan cheese, fresh parsley and salt (optional, to taste) onto corn. Sprinkle fresh lime onto corn (optional).
- Serve and enjoy!




OMG, the corn season is on its way and my husband and I can’t wait to have it every day! I have never made mine in the oven and yours look so beautiful! I will be giving it a try as soon as I grab my corn!
Thank you so much, Edyta! Yes! Give it a try and let me know what you think! 🙂
This is such an easy way to prepare corn on the cob! I’ve never thought to make it in the oven until now. The parmesan cheese gives it a great flavor too!
I’m so glad you found this easy way to make corn on the cob, Elizabeth! Thank you for sharing!
We loved it. Nothing like a classic method for corn on the cob. Roasting just brings out all the goodness of flavor and texture. Thanks for sharing!
Thank you Traci!! Glad you all loved it!
The Oven Roasted Corn on the Cob recipe is an absolute game-changer! Each bite is an explosion of flavors – the sweetness of the corn perfectly balances with the savory Parmesan and herb butter. The oven roasting method intensifies the corn’s natural taste, giving it a delightful, slightly smoky edge. And that Parmesan Herb Butter? It’s rich and aromatic, the herbs infusing each kernel with a delectable depth that Parmesan subtly enhances. Yumm!
Happy to hear you enjoyed it so much, Tavo!
Wow, this was so delicious and easy to make. I just topped them with more butter after baking and a few pinch of salt. My family devoured it!
Thank you! I love just the butter and salt combo too – simple and delish!