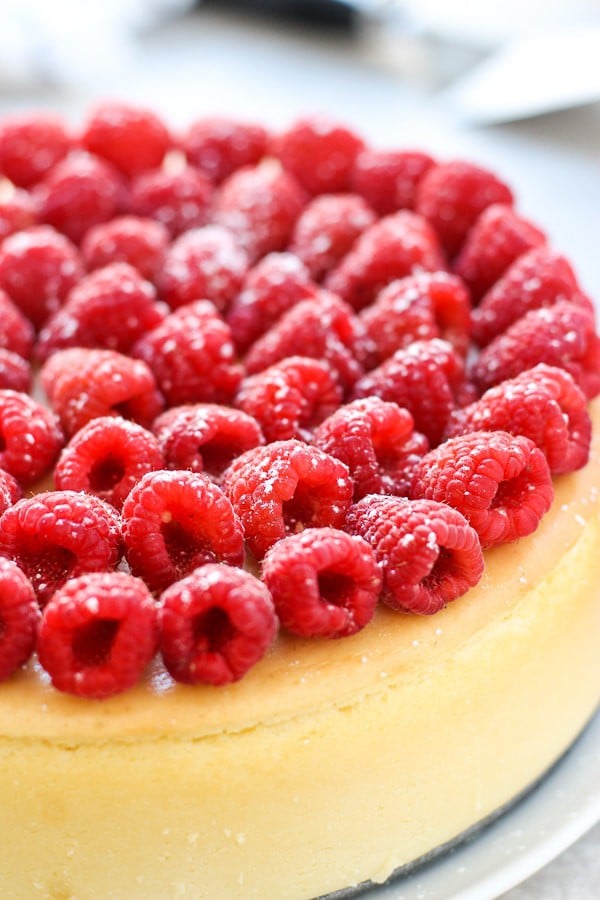
This decadent crustless Italian cheesecake is light and fluffy, made with ricotta cheese and cream cheese, is without a crust but instead surrounded by a sweet caramelized shell from baking in the oven.
Introducing my go to cheesecake recipe, this lovely Italian Ricotta Cheesecake, which in my humble opinion, is the best cheesecake ever. Like really truly the best kind of the best.
What is Italian Cheesecake?
This crustless Italian cheesecake is a recipe from my dear friend Diane, who inherited it from her Italian family. Diane used to make this all the time when we were roommates, and this ricotta cheesecake recipe is what made me fall in love with cheesecakes.
This has been my go-to cheesecake recipe ever since whenever the cheesecake craving hits!
Key marks of this delicious Italian cheesecake:
- Uses ricotta cheese so it has a rich flavor yet it is not overly heavy or dense. It is creamy, fairly light and slightly airy.
- It is crustless, which is typical of traditional Italian cheesecake. There is no graham cracker crust, but instead is surrounded by a caramelized layer formed after sugar and butter is baked in the oven. That sweet browned caramelized layer is my favorite part of this cheesecake – it brings a ridiculously beautiful texture and taste to contrast that creamy richness of the Italian cheesecake. And let’s be honest here, because it’s a crustless cheesecake, it’s one less thing to make!
- Incorporating sour cream gives it a slight citrus-y flavor, making the flavor more well-rounded, and balances out the richness and the creaminess.
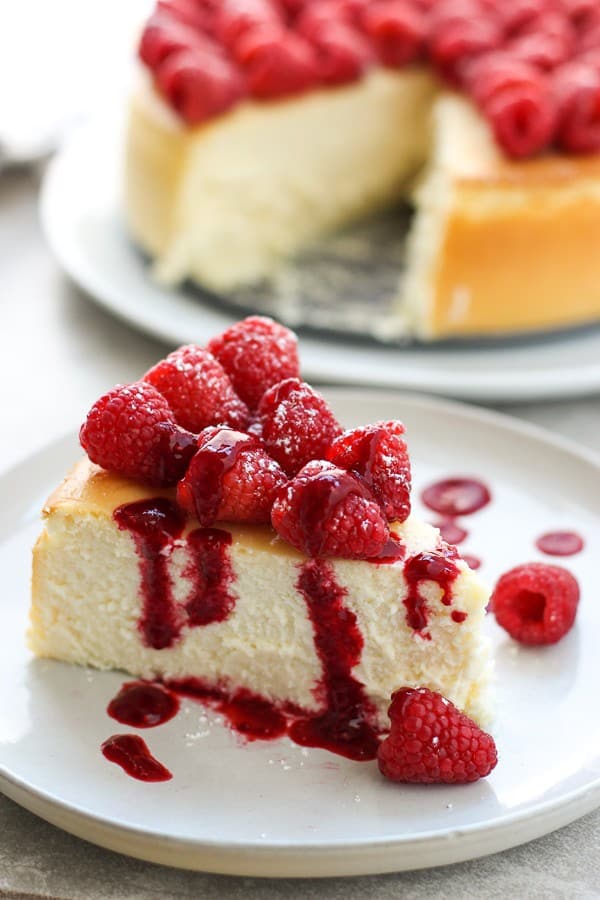
- Served with berries on top to balance out the rich and creamy ricotta cheesecake. You can serve it plain without the berries and sauce if you prefer, it is up to you.
There are so many versions of what you would call an Italian cheesecake, and this is one of them. Think of this as my take on Italian cheesecake, with notes and components from it, but it is not necessarily fully authentic.
Italian cheesecakes usually include ricotta and are typically lighter and fluffier compared to New York Cheesecakes, which are creamier and denser.
That lighter texture and the use of ricotta is what made me fall in love with Italian Cheesecake. And this crustless Italian ricotta cheesecake definitely pays tribute to that.
With the holidays coming up, Italian ricotta cheesecake is the PERFECT holiday dessert! Make this for Thanksgiving, Christmas, New Years’ Eve, and holiday parties!
But seriously, you don’t need a reason to crave this delicious crustless Italian ricotta cheesecake. If it is not the holiday season and you need some cheesecake in your life…I say make it anyway!! 🙂
Ingredients
This Italian ricotta cheesecake recipe calls for pantry-friendly, and a fairly shortlist of ingredients. And since it is crustless, I honestly think that makes it even more straight-forward!
Here are the ingredients you will need:
- Whole milk ricotta – You can use skim or non-fat ricotta but I think whole milk ricotta works better for our Italian ricotta cheesecake because it’s creamier.
- Cream cheese – Yes! We are using both ricotta and cream cheese for a lovely blend of flavors! Make sure to leave it out for a few hours so it’s softened before use. Opt for full fat cream cheese for best flavor. Avoid reduced fat.
- Sour cream – Brings a tangy flavor to the cheesecake and gives it a light texture. Bring it to room temperature before using if possible.
- Granulated sugar – Adds sweetness to offset the creaminess in the cheesecake and instrumental in crust caramelization.
- Eggs – Adds creaminess and serves as a binder. Room temperature eggs is even better.
- All-purpose flour – Used o thicken cheesecake filling.
- Pure vanilla extract – Use good quality pure vanilla extract to enhance overall flavor.
- Unsalted butter – Adds richness to the cheesecake.
- Lemon zest – Brightens up the flavors in our Italian cheesecake.
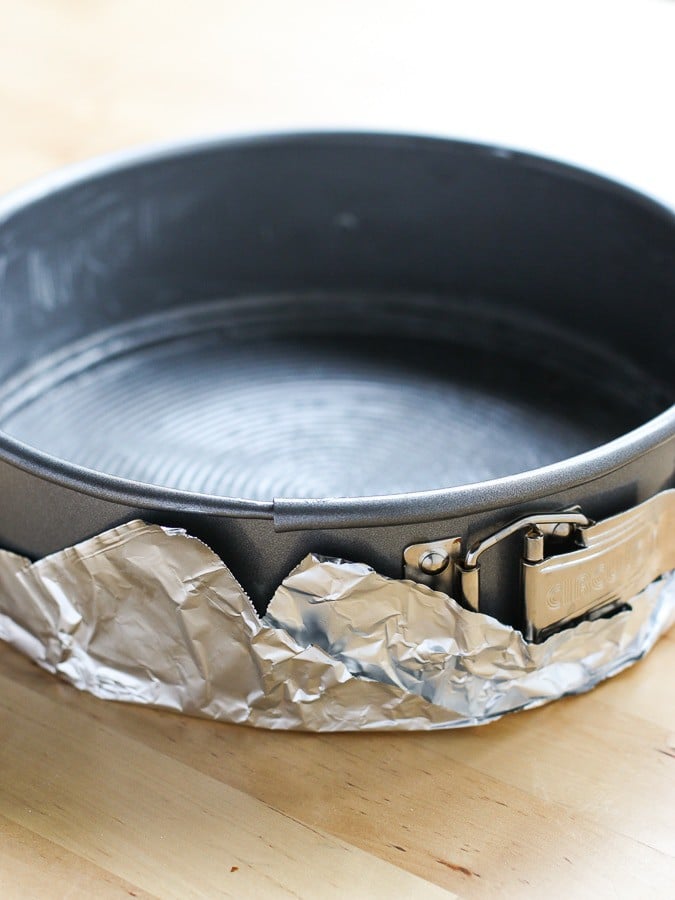
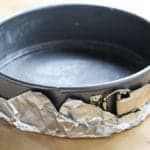
In terms of kitchen tools, you will also need a 9-inch round springform pan – so that you will be able to release the sides once the cheesecake is done, instead of having to dig the cheesecake out from the pan (Yeah, don’t do that…). These springform pans are fairly cheap and you can find them anywhere!
I highly recommend wrapping the springform pan with aluminum foil to prevent any leakage of liquid into the oven while it is baking. See picture below.
How to make crustless Italian ricotta cheesecake
While this crustless Italian cheesecake recipe is pretty easy to make and has a short list of ingredients, note that it does requires some time and a little bit of advanced planning.
In other words, if your cheesecake cravings hit and you hope to have your crustless ricotta cheesecake in the next hour, you are kinda out of luck.
It does take a few hours for this Italian ricotta cheesecake to set and cool and. But trust me, the wait IS ALL WORTH IT once you bite into this life-changing, as-good-as-gold, delicious cheesecake!
Step 1: whisk ricotta cheesecake Batter
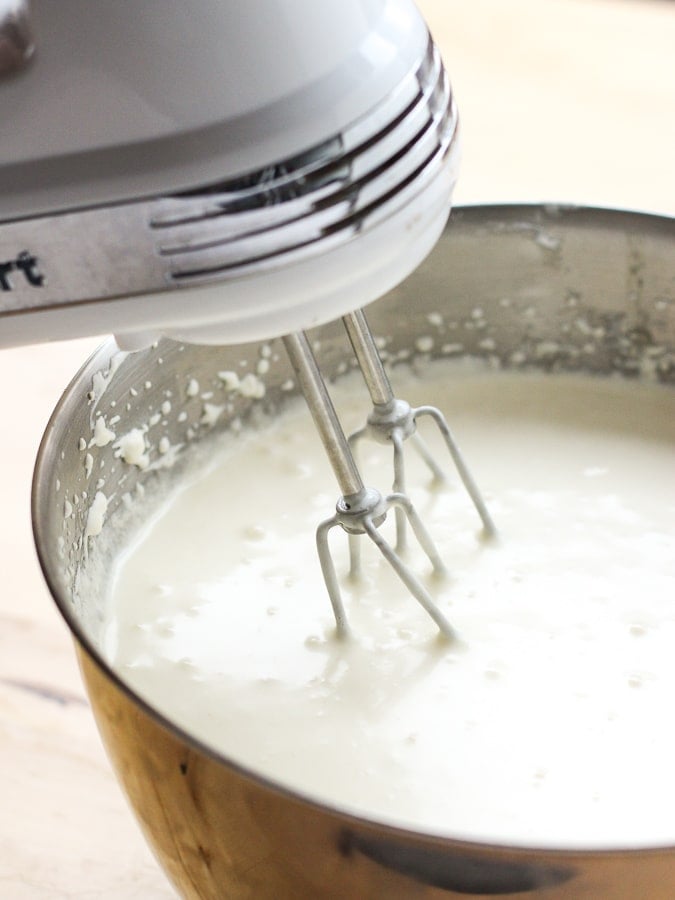
Let’s bring together the filling of our crustless ricotta cheesecake by whisking all the ingredients (ricotta, softened cream cheese, sour cream, sugar, eggs, flour, vanilla extract) in a large bowl until very smooth.
It is recommended to whisk this for 20 minutes. It does seem like a long time, but we really want the remove any clumps and our Italian ricotta cheesecake needs to be Smooth with a capital S.
Pro tip: if you have a stand mixer, it will make this part of the process a whole lot easier! Another option is to bring the cheesecake batter to a food processor and smooth it out that way.
Step 2: Bake & Rest
Next, grease spring foam pan generously with butter.
Once the ricotta cream cheese cheesecake filling is whisked well together, pour the filling into the prepared spring foam pan.
Bake Italian ricotta cheesecake in the oven for 1 hour. Make sure oven rack is in the middle of the oven.
And here’s a unique part of the process: when it is done, switch off the heat in the oven but do not open the oven door, and let cheesecake sit in the oven for 2 hours.
Cooling the cheesecake slowly (not dropping the temperature drastically while it cools), will lessen the cracking.
Step 3: Refrigerate and wait some more…
Remove from the oven and gently release the crustless cheesecake by removing the sides of the spring foam pan.
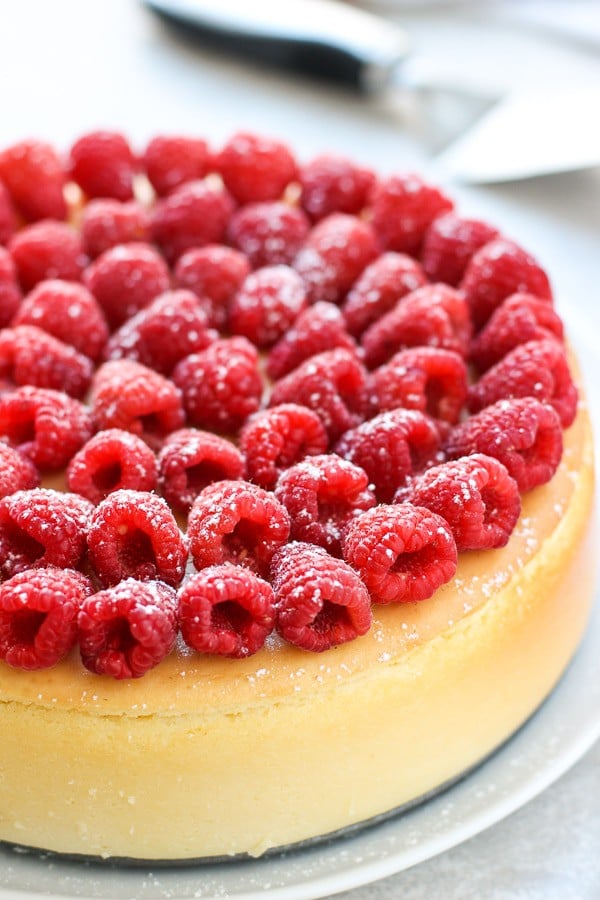
Your Italian ricotta cheesecake should have a nice golden brown exterior and be slightly soft and jiggly on the inside.
Keep the bottoms of the spring foam pan stuck to the crustless cheesecake and transfer to a cake stand or container, and refrigerate crustless cheesecake for up to 4 hours or overnight, until your Italian ricotta cheesecake firms up.
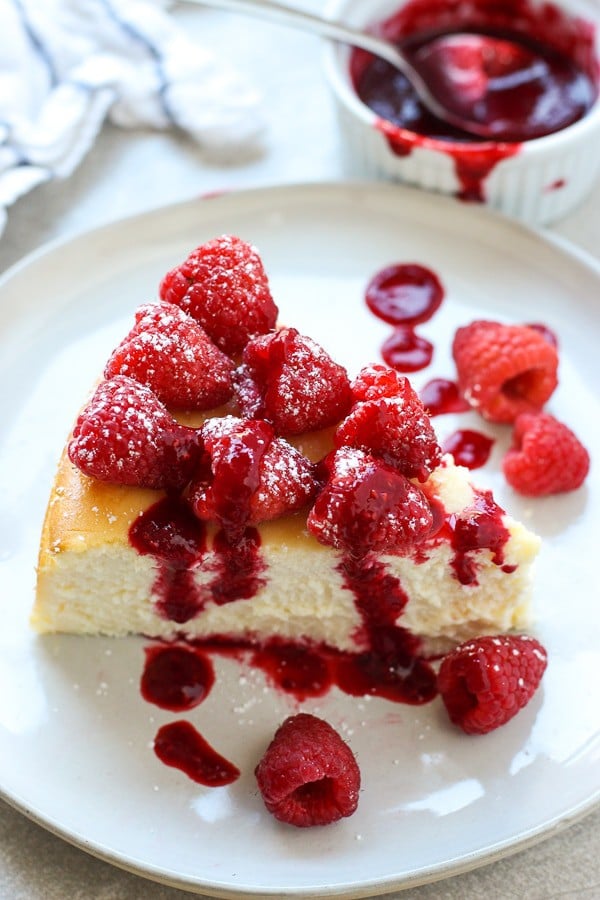
Step 4: Top with berries (or not…)
If you are a cheesecake purist and don’t do berries or toppings on your crustless cheesecake because it will hinder your Italian ricotta cheesecake experience, I actually kinda understand that and see where you are coming from. Especially when this cheesecake is amazing enough to stand by itself!
However, if you want to bring another layer of texture and flavor to further enhance the Italian ricotta cheesecake, top it with some fresh raspberries and make this incredible yet simple raspberry sauce recipe that goes perfectly with the cheesecake. It takes it OVER THE TOP.
If raspberry sauce isn’t your thing, try this strawberry topping instead!
Also, if you experience some cracking on the crustless cheesecake (because we are all humans, and cracking the cheesecake just happens!), the raspberries are the perfect way to hide it! 😉
Make Ahead and Storage
Considering the necessary refrigeration period, making the dessert a day ahead is actually preferable!
After taking the cheesecake out of the oven (following two hour cooldown), wrap cheesecake with aluminum foil and store in the refrigerator. Top with topping only when ready to serve.
To freeze cheesecake, wrap the cooled cheesecake (without toppings) well in plastic wrap, then place in a ziplock bag and freeze for no longer than 2 months. Ideally, it is better to eat cheesecake fresh if possible.
Tips and Tricks
A few tips and tricks when making this crustless Italian ricotta cheesecake:
- Use room temperature ingredients: Eggs, cream cheese, butter, and ricotta should be brought up to room temperature before use. This will allow them to be mixed without clumps and help in reaching the desired consistency of the batter.
- Beat until super smooth: Take the time to beat it up well so that the mixture achieves the perfect consistency, i.e. smooth, fluffy, and creamy. Use a stand mixture or electric hand mixture and whisk the ingredients on medium high speed for 20 minutes. Yes, it is time consuming and a lot of beating. But again – WORTH IT! 😉
- Reduce cracking: Drastic temperature changes cause cracking, so let the Italian cheesecake sit in the oven for 2 hours after it is done baking. However, cracking is still very possible! I will admit, I am not cheesecake expert – I have made this multiple times, and it almost always crack slightly on top. So if your cheesecake cracks a little bit, don’t fret over it! Top some berries on there and call it a day ;). Or just eat it as is, because I promise you, it will still tastes glorious. A water bath can be used, but it is not necessary with this method.
- Using a springform pan: This is a must! In addition, make sure to grease it with butter so that your crustless cheesecake doesn’t stick to it.
- Add the toppings right before serving: Wait until the very last moment to add fruit toppings; you don’t want soggy cheesecake!
Frequently Asked Questions
You can but it is not necessary. The purpose of the water bath is to make the cheesecake creamier and smoother, and also to reduce cracking. In this recipe, we circumvent these by whisking the mixture thoroughly for 20 minutes (to ensure the cheesecake is smooth and creamy), and letting the cheesecake sit in the oven for 2 hours after baking (to reduce cracking).
I’ve found that this is really effective in creating a creamy, smooth cheesecake texture and to prevent cracking later on as well. If you experiment with longer or shorter beating times, let me know what your results are!
Your cheesecake may have cracked due to overmixing or sudden cooling. To prevent overmixing, ensure the ingredients are at room temperature so they mix together smoothly. Let the cheesecake cool gradually in the oven for two hours to avoid cracking.
As long as the cheesecake is fully cooked and not overly raw, it is okay to serve a slightly sunken cheesecake. When you top it with jam and other toppings, no one will see! (Another reason for the toppings heh heh)
Any berries, cherries, jams, or fruit sauces work well with cheesecakes. Consider decorating with mint sprigs for a splash of color!
Store it in the refrigerator in an air tight container for up to 7 days.
Absolutely. Cheesecake freezes very well and the consistency shouldn’t change after freezing.
ENJOYED THIS RECIPE? Tell us what you think by leaving a rating and review below! 🤍
More delicious desserts
Since we are in fact in November, a.k.a. holiday season, check out these other fun desserts to make this holiday!
- No Bake Cheesecake Bites
- Easy Pumpkin Pie (with condensed milk)
- Mini Chocolate Chess Pie
- White Chocolate Peppermint Cookies
- No-Bake Chocolate Tart
- Individual Mini Peach Cobbler
- Chocolate Cherry Brownies
- Chocolate Marshmallow Cookies
- Peanut Butter Rice Krispie Treats

Italian Ricotta Cheesecake
Equipment
Ingredients
Cheesecake
- 16 oz whole milk ricotta
- 16 oz cream cheese softened
- 16 oz sour cream
- 2 cups granulated sugar
- 4 eggs
- 1/2 cup flour
- 1 tsp pure vanilla extract
- 1/2 cup unsalted butter melted
- 1/2 tbsp unsalted butter melted
- 1 tsp lemon zest from 1 lemon, optional
Toppings
- 1 cup fresh raspberries
- 1/2 cup raspberry sauce
- 1 tbsp powdered sugar
Instructions
- Pre-heat oven at 350 degrees F.
- Bring whole milk ricotta, softened cream cheese, sour cream, sugar, eggs, flour, vanilla extract, 1/2 cup melted butter into a large bowl. Mix well and beat on medium high speed (using a hand-held mixture or standing mixture) for 20 minutes.
- Butter springform pan with the other 1/2 tbsp of melted butter and wrap aluminum foil around the pan to prevent leakage.

- Pour cheesecake mixture into springform pan. Bring to oven and bake on the middle rack for 1 hour.
- Turn off oven and let cheesecake sit in oven for 2 hours. Do not open oven – we want to cool the cheesecake slowly.
- Remove cheesecake from oven. Cheesecake might be slightly jiggly in the middle. Gently release the sides of the springform pan from cheesecake.
- Refrigerate cheesecake in the fridge for another 4-5 hours, or overnight, until cheesecake is firm.
- Optional: top cheesecake with fresh raspberries, then sprinkle raspberries with powdered sugar. Slice and drizzle with raspberry sauce.
- Serve and enjoy!
Recipe Notes
- If ingredients are cold, bring it to room temperature first.
- Avoid dropping the temperature of cheesecake to prevent cracking – that’s why we are suggesting leaving it in the oven for 2 hours for it to cool.
- Water baths can be used but it is not necessary with the cooling-in-the-oven method.
- Cover cracked cheesecakes with berries and sauces! 😉 It has the benefit of making cheesecake super yummy with the additional toppings!


Can I add chocolate chips to the mix
Sure!
Just found my answer whoops
Can I substitute whole milk yogurt for sour cream? Seems like it should work. What do you think?
I do not recommend that substitute – the consistency and flavor is pretty different.
Mix for 20 minutes?? I’ve never seen a cheesecake recipe mixed that long. Why?
Yes! I know it feels like a long time, but this will makes it super creamy, fluffy and smooth, and ensures a clump free texture. I got this recipe from my friend’s Italian family and I’ve just followed it and it always comes out so good!
LOVE THIS RECIPE!
I WISH I COULD POST A PIC BECAUSE IT IS LOOKS PERFECT AND NO CRACKS!!
I ONLY HAD 8OZ OF SOUR CREAM SO I USED 8OZ OF VANILLA PROTEIN YOGURT AND IT WORKED PERFECTLY.
I ALSO ADDED JUICE OF ONE LEMON CAUSE I’VE NEVER HAD CHEESECAKE WITHOUT IT AND YUUUUUMMMM!!!
20 MINUTES IN THE MIXER SEEMED LIKE A LONG TIME, BUT IT DEFINITELY SMOOTHED OUT ALL THE SOUR CREAM CLUMPS.
I THINK THIS WILL BE THE DESSERT I MAKE FOR GATHERINGS GOING FORWARD.
Thanks so much for sharing your modifications and I am so glad you love this recipe!
Good – cut back to half cup castor sugar.
Thanks for sharing your modifications, Mary!
I wanna say it is AMAZING!! I made it for a Baby Shower in the office and I don’t like to taste it @ all, I wait for everyone’s feedback THEN, I try it! EVERYONE was raving about it so I tried it and W O W!! I had doubled my batch since I wanted to make 2, 1 for the fam, and couldn’t find 1 of my spring pans so I covered the batter and figured I’d make the other 1 when I got home! I have to say that by waiting a day the flavors infused it and it TASTES IS AMAZING! But it didn’t stop there, I actually STILL had batter left over and thought I’d try something and add a little almond flavor and left it sit again overnight and I’m just popping it in the oven this morning! I’m sure this one will be 10X better! Can’t wait to savor it!!!
Amazing! This comment makes me so happy! Thank you for sharing! <3
so I have some family members who dont like sour cream, would the recipe still work if I remove the sour cream completely?
I think it will be very different if sour cream is just removed completely. I haven’t tried it on this particular recipe but Greek yogurt is typically a good sub for sour cream. I imagine it will be a bit lighter but I think it should still be pretty similar. Please let me know what you think if you try it! 🙂
Followed this recipe exactly as written; when I took off the springform sides the entire cake collapsed after 3 hours in the oven.
Oh no, I’m sorry to hear that! Since many has made this recipe successfully, I would recommend checking on your oven temperature with an oven thermometer as ovens could run cooler (or hotter) than what it says. Hope that helps!
Dang this is delicious. Very light and easy to make. It did overflow, so I guess you need a 10″ pan? It did not slice up super neat, but I’m still saying dang this was delicious lol.
You can try using a 10″ pan if needed – I wonder if the sides are not as high as my 9″ pan. So glad you enjoyed it though!
I’m just about to make this and was wondering what size springform pan?
I followed this recipe to a T. Instead of one 9″ cheese cake, it made 1- 9″ cake and 12 cupcakes! What happened? It was good though! 🙂
The cake pan should be high wall. It should fill it up right to the brim. I’m glad it tastes good though!
I made this at Christmas and it was delicious.
Making another one today but keto. Replaced sugar with 100% pure granulated allulose and replaced the 1/2 cup flour with 1/4 cup coconut flour and 1/4 cup almond flour. Added a teaspoon fresh lemon juice and a total of 2 teaspoons lemon zest. Also added fresh blueberries I cooked down. I swirled it into the mix and then topped with fresh blueberries.
It is in the oven now.
Happy to hear it came out delicious! Looking forward to hearing about how the keto one comes out!
the keto verion came out great. We served it to a small group and no one could believe tjere were no carbs or sugar. It rose just the same and the texture was the same as your regular recipe.
I’m making this for the 3rd time, it’s delicious. I’ve added orange extract and zest and it makes it extremely delicious.
That’s great to hear! Thanks, Judy!
best cheese cake ever thank you for creating it
I wish I could take credit for it but it’s my old roommate’s Italian grandma’s recipe! It’s divine, isn’t it! <3
This looks amazing! I was wondering, I don’t have a springform pan, do you know if I could make this in a pie pan, or other baking dish? Thanks!
You can probably fit as much as you can into any baking dish, the only thing is you won’t be able to release it after it is baked. You will have to serve the cake out of the pan you bake in. If you’re ok with that I say go for it!
The 1st time I made this I did not have the correct pan. I used a deep pie pan and using aluminum foil and parchment paper, I built the sides up. it worked, but the top took the shape of an old hat. I ended up serving it up-side-down. Just het the correct pan. Amazon has several for pretty good prices.
Just wondering when to add in the lemon zest and juice?
I would add it along with the cream cheese, vanilla extract etc!
Second time making this – everyone LOVED it the first time (and I use the lemon zest and 1 T of lemon juice.) Based on reviews, I preheated to 350, reduced heat to 325 after putting cake in the oven, baked for 1.5 hours and left in oven for 3 hours. Removed and cooled before wrapping and storing overnight in fridge. Excellent result!
I forgot to buy sour cream so used 16 oz of Painterland Plain Skyr yogurt instead. AI said to add a bit more vanilla to compensate, so I used 1/2 scraped vanilla bean along with the recipe amount of extract.
Last time I worried about overflowing, so I left 2 ramekins worth of mixture out of the main springform. I decided it would not have overflowed, so this time I put all of the mixture into my one springform pan. (And put a safety sheet pan underneath just in case.)
Fingers crossed it turns out as well as last time, since this one was a special request for a birthday.
PS. If it helps anyone with a Miele Masterchef oven, I use the Bake Surround setting as well as the “Delay” feature to preheat the oven, set the cooking time and the time to turn the oven off. Then I put a post it note on my fridge to remind me to take the oven out after it has cooled in the oven for the final 2 hr cooling.
Thanks so much for sharing, Peggy! Appreciate all the details to help others who are baking this as well! <3