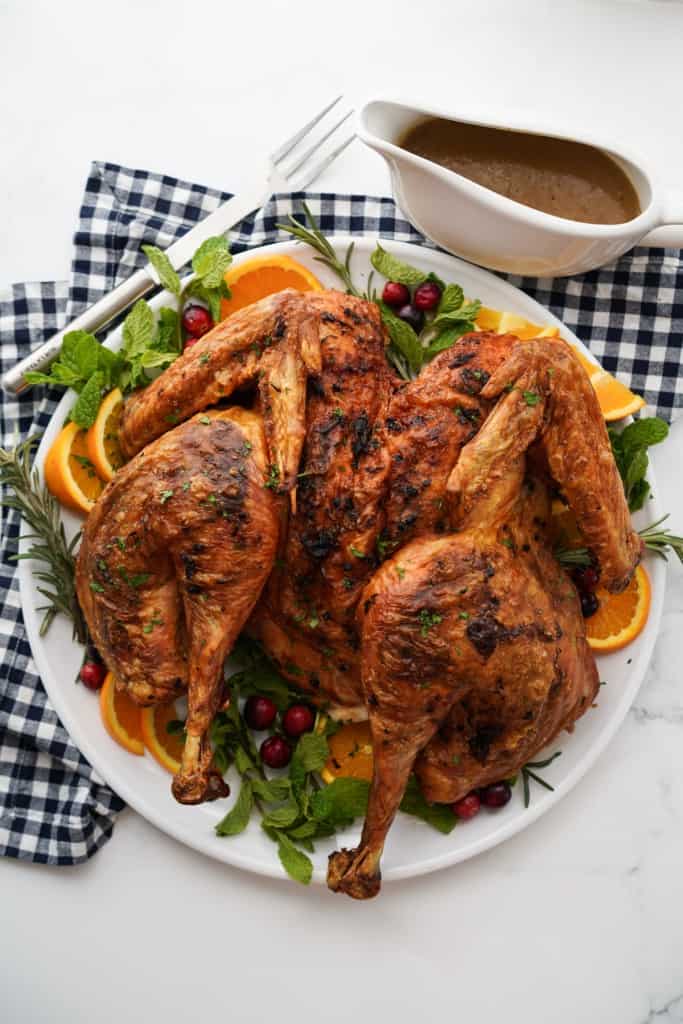
Prepare your Thanksgiving day turkey the easy and delicious way by spatchcocking the turkey! Spatchcocked turkey is an easy and delicious method of cooking poultry where you remove the backbone of the turkey so that it cooks faster and more evenly.
We always spatchcock our turkey these days because this method produces incredibly moist turkey meat with a crispy, flavorful turkey skin that cooks in a fraction of the time. Ever since we discover this method, it’s now the only way we make a whole turkey!
Why Spatchcocked Turkey
I’m convinced at this point in life that this is probably my most favorite way of cooking turkey for Thanksgiving. Other names for spatchcock turkey are “butterfly turkey” and “flattened turkey”, because that is literally what it is.
Carve out the backbone, then press down hard on the cavity to crack that hard breast bone and flatten the turkey so that the turkey lays flat. That’s what you do for spatchcocked turkey.
It may sound intimating, but it is really not that hard. I’m here to prove it and show that there’s no reason to be nervous about preparing a spatchcocked turkey. If I can do it, you can do it.
Spatchcocked turkey the EASIEST hassle-free way to prepare a turkey that’s also flavorful, moist, not dry….you know, all the issues or complaints you normally hear about preparing a turkey for Thanksgiving. After trying many different methods and recipes, this is is HANDS DOWN my preferred choice.
The trick with cooking a whole turkey is that different parts will cook at different paces, but spatchcocking it actually helps even it out more than if we just put the whole turkey in the oven. Because it lies flat, it also roasts in less time than a traditional whole bird.
You can also use the spatchcock method to lay the turkey flat, season it with the brine and butter compound, and smoke it on the grill instead of roasting in the oven.
If you’re cooking for a smaller group for Thanksgiving, you can spatchcock a smaller turkey or just roast up a turkey breast.
Don’t forget to make some gravy, cranberry sauce, and mashed potatoes to serve alongside this spatchcocked turkey to complete your Thanksgiving meal. If you want to go beyond the basics, Honey Balsamic Brussels Sprouts and Spaghetti Mac and Cheese are some of my personal favorites. A pan of Apple Stuffing with Celery Herbs and Onions is a cozy match for it too.
Tools Needed
The trick to success for spatchcocked turkey is really having sharp and sturdy kitchen tools.
- Kitchen shears: Not just any pair will do, you need a sharp one that can cut through bones easily. This is the one we use and love. It was gifted to us years ago and it is simply the best. We use it for general kitchen stuff.
- Instant read meat thermometer: There’s no better way to get a juicy turkey than to get the thickest part of the breast to hit 165℉ and remove it promptly. The best way to achieve that seamlessly is to use a high quality meat thermometer. It’s worth the investment!
- Sharp chef’s knife: This makes carving the turkey much easier.
- Big cutting board: You’ll want plenty of room to carve the whole turkey.
- Half sheet pan: To roast the turkey and veggies on.
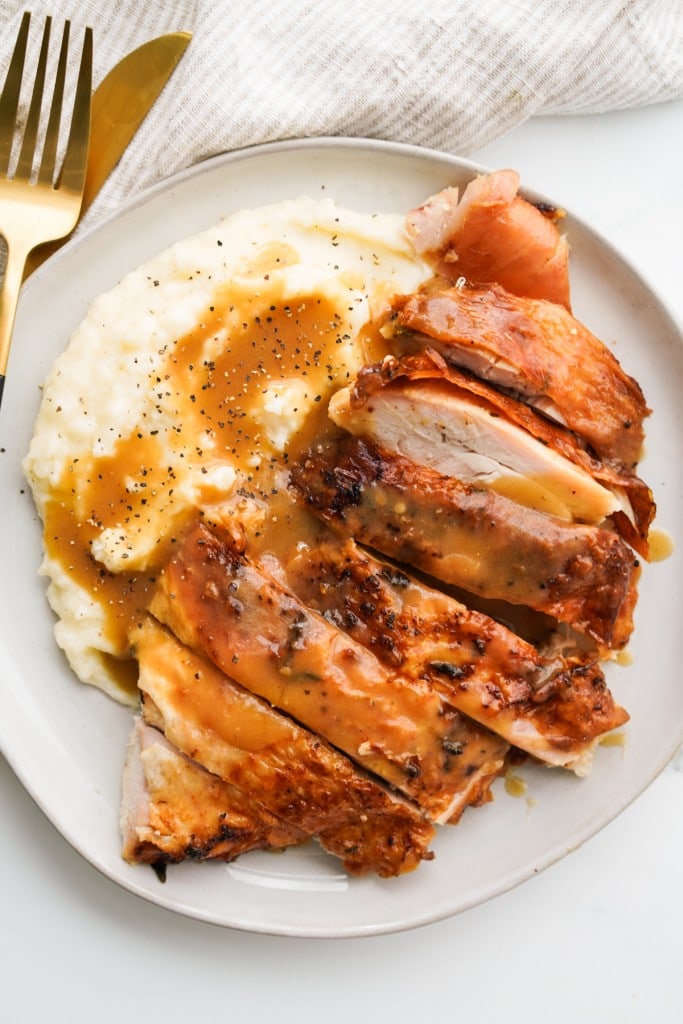
Ingredients for this spatchcocked turkey recipe
Okay! Let’s talk about a few key ingredients used to make our spatchcock turkey! It is not a lot and I truly believe less is more.
Here’s what you need:
- Whole turkey: I typically get a 10-12 lbs turkey. I have done both frozen and fresh turkeys, and both methods work fine. Remember to defrost frozen turkey well ahead of time in the refrigerator (1 day for every 5 lbs of turkey).
- Unsalted butter: This is basically what brings SO MUCH flavor to the turkey and to keep it moist. We will be stuffing it under the skin, spreading it on top of the skin. It’ll be EVERYWHERE! Do NOT use salted butter. If you use salted butter, you will want to significantly reduce the salt for brining the turkey and also the salt in the herb butter compound.
- Herbs and spices: These get combined into the butter mixture and we are going to rub it all over the turkey, and under the skin as well. I use a simple thyme, rosemary and garlic combo. It is a winning compound butter (if I may say so myself).
- Salt: Used in the 1) dry brine to ensure the turkey meat is flavorful, and 2) compound butter to bring flavor to the turkey meat. Coarse kosher salt is a good choice because it’s easy to sprinkle evenly over the whole bird.
- Black pepper: Stirred into the compound butter for a little warmth and bite.
- Veggies: The Turkey will be resting on carrots, celery, and onions while it cooks in the oven. These ingredients bring lots of wonderful flavors into the turkey, and also flavor the drippings to make the best gravy.
How to Spatchcock a Turkey
Spatchcocking a turkey sounds intimidating, but don’t be intimidated! You got this! Simply follow the instructions below and before you know it, you’ll be spatchcocking a turkey like a boss and will never want to cook turkeys any other way.
I promise – it’ll be easier than you think!
Note that you will want to first completely thaw the turkey. If turkey is frozen, bring it to the refrigerator a few days before to let it thaw. For every 5 pounds of turkey, you will need to defrost it for 24 hours in the fridge, i.e. a 10 pound turkey will take 48 hours to thaw in the refrigerator.
Step 1: Prepare the bird
Remove the neck and the bag of giblets (found in the cavity of the bird). Discard them, or save them for gravy. Pat the turkey dry with paper towels. There’s no need to rinse the turkey because the high heat in the oven will kill the bacteria. Washing will only increase cross contamination.
Step 2: Remove the backbone
With its breast-side down, locate the backbone. Using a sturdy pair of kitchen shears, cut along one side of the backbone, then cut down the other side. You’ll want to cut the backbone out, discarding it. When you cut along the side of the backbone, you will be cutting through some bones, but sturdy shears will do the job without any problem. I have found a sharp knife much harder to use than a sharp, sturdy pair. Warning: there will be some crunchy sounds as you cut through the bones but keep going! 🙂
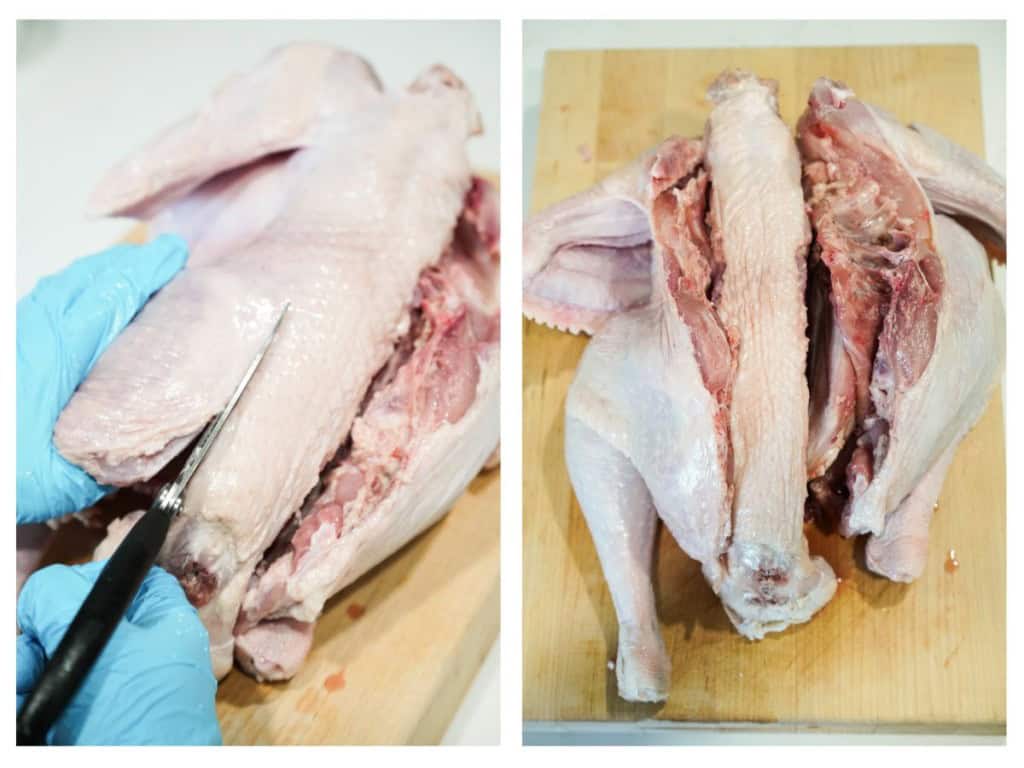
Step 3: Break the Breast bone
Turn the bird over, with the turkey breasts facing upwards. Use your hands (and your body weight) to press down along the middle of the bird, breaking the breast bone, thereby opening your turkey up and flattening it out.
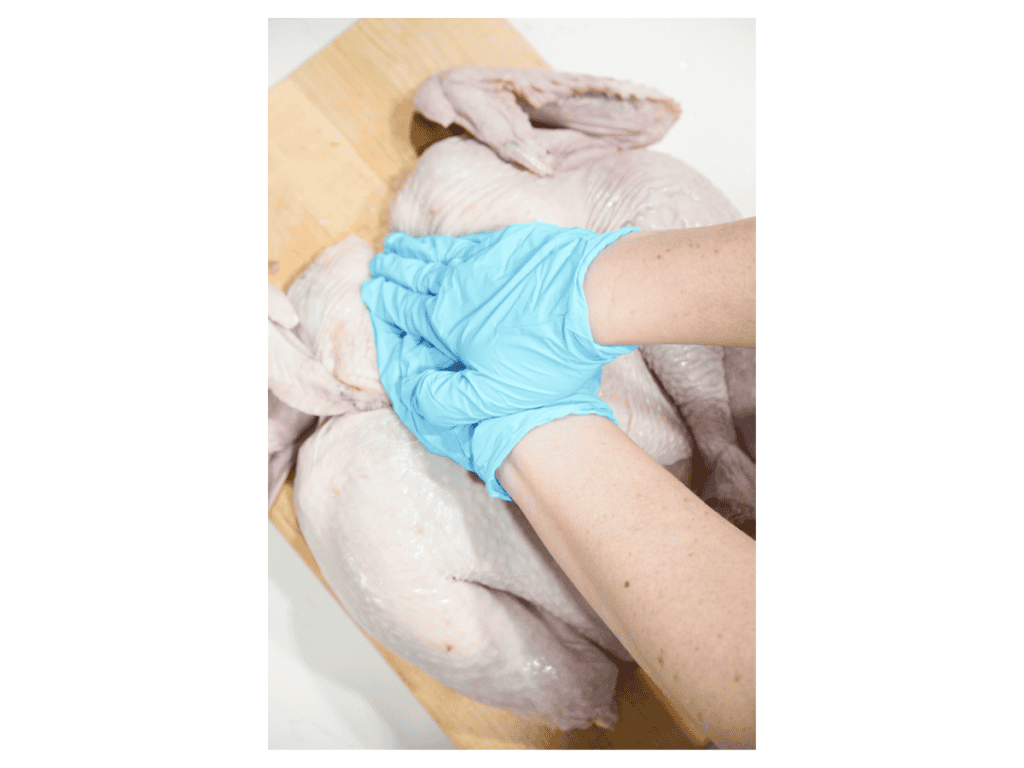
Step 4 (optional): Tuck The wing tips under the turkey breasts
This will prevent those little wing tips from burning during cooking in the oven.
How to Cook Spatchcocked Turkey
Step 1: Brine Turkey
Just like my Dry Brine Roasted Turkey recipe, I like to do a quick dry brine on my spatchcocked turkey too. I find that brining for a full 12-24 hours is a bit much and not necessary, but not brining at all makes certain parts of the turkey (like the turkey breast) a bit bland. So my solution is a quick brine.
By brining the turkey, the salt will also absorb the moisture in the skin, allowing our spatchcocked turkey to crisp up even more in the oven.
To brine the turkey, generously season turkey all over with salt, getting the salt under the skin as well. Let turkey sit for ~4 hours.
Step 2: Dress Turkey
Prepare compound butter by bringing together 10 tablespoons of softened unsalted butter with chopped thyme, chopped rosemary, minced garlic, salt, and black pepper.
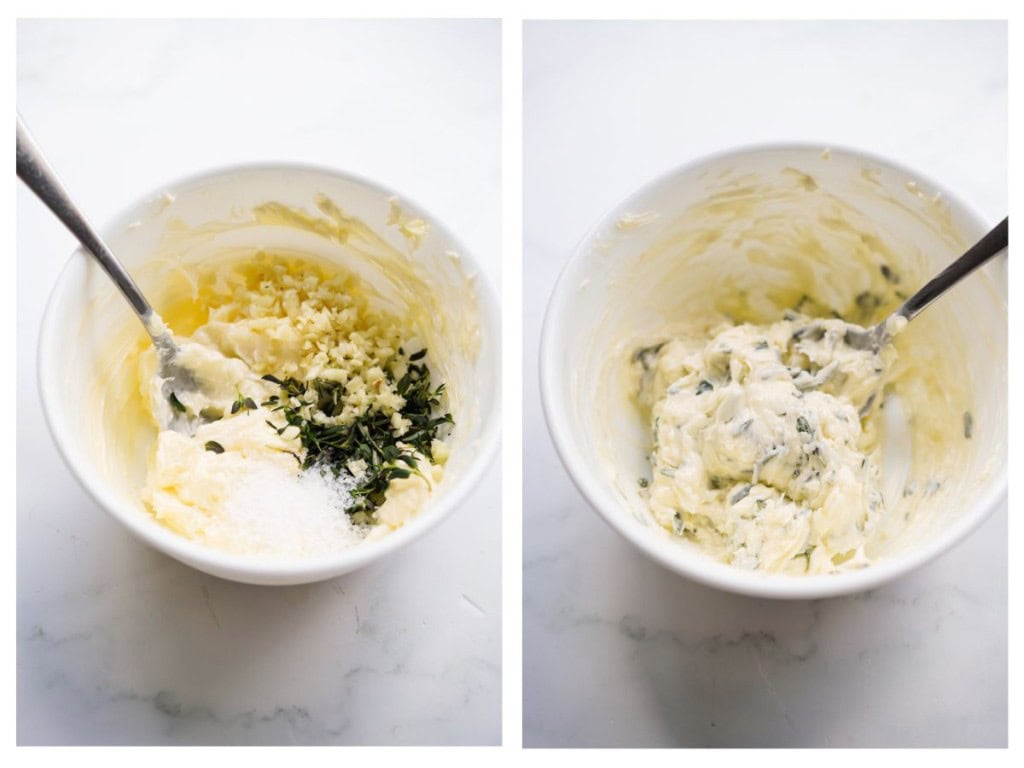
There’s no need to use an expensive roasting pan to roast the spatchcocked turkey. I use a regular sturdy half sheet pan and it works beautifully.
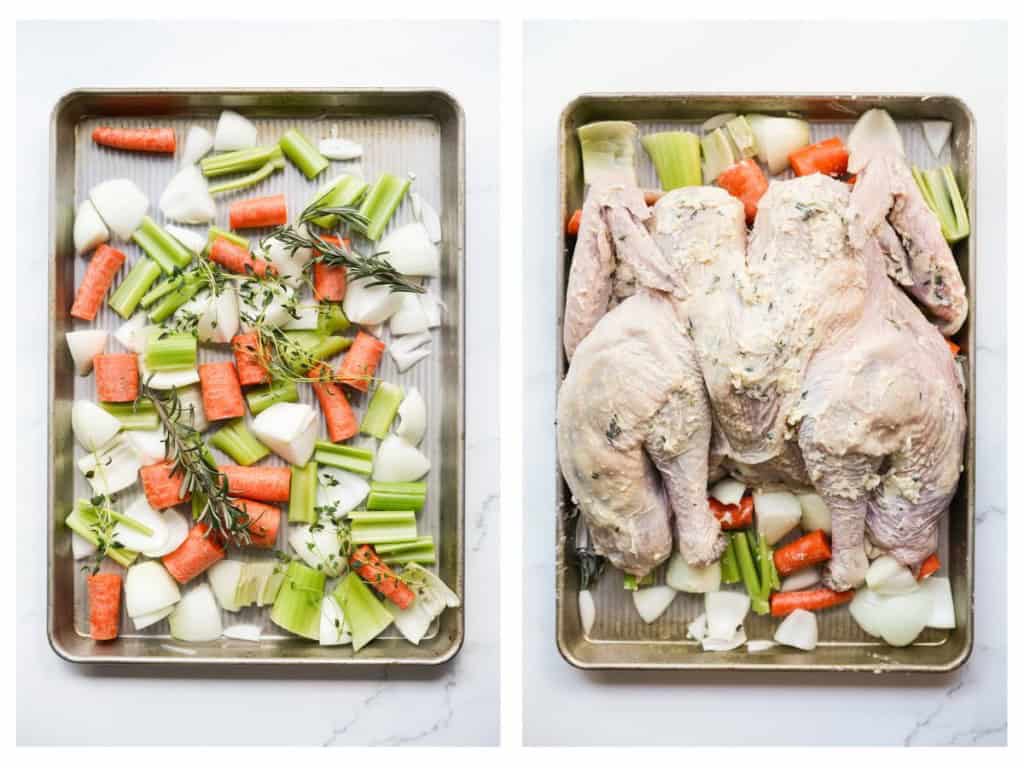
So grab a baking sheet pan, spread out the vegetables – carrots, celery, and onions– on the pan, then top with fresh herbs. Place that spatchcocked turkey bird on top.
You can place a rack on top of the veggies and then place the bird on the rack if you’d like, but it doesn’t make a big difference in my experience.
Carefully detach the skin from the breast, thigh, and drumstick meat without tearing it. Using your finger (or a spoon), rub the compound butter between the skin and the meat, and place some on top as well. Do this for all parts of the spatchcocked turkey, especially the turkey breast.
It is important to get the compound herb butter below the skin (not just on top of the skin) so that the delicious flavors can seep into the meat.
Step 3: Roast Turkey
Transfer the sheet pan or roasting pan to the oven, which should be preheated to 400℉. Keep the turkey breast side up.
Roast spatchcocked turkey for about 8-9 minutes per pound. Cooking time varies by turkey size, how cold the turkey is when it goes in, and your oven, so treat the time as a guide and let a thermometer tell you when it’s done. The cooking time guide below has estimates by weight.
Step 4: Check The Temperature
Start checking about 15 minutes before the low end of your time estimate. Slide an instant read meat thermometer into the thickest part of the breast, keeping the tip in the center of the meat and away from the bone, since bone reads hotter than the meat around it. Then check the innermost part of the thigh, again avoiding the bone.
Remove the turkey promptly once the thickest part of the breast reaches 165℉. The thigh should read 165℉ or higher too. If the thigh is still under 165℉, pop the turkey back in the oven for a few more minutes and check again.
Avoid overcooking the turkey. The more the temp climbs north of 165℉, the higher the chance of the turkey meat drying out.
Step 5: Rest The Turkey
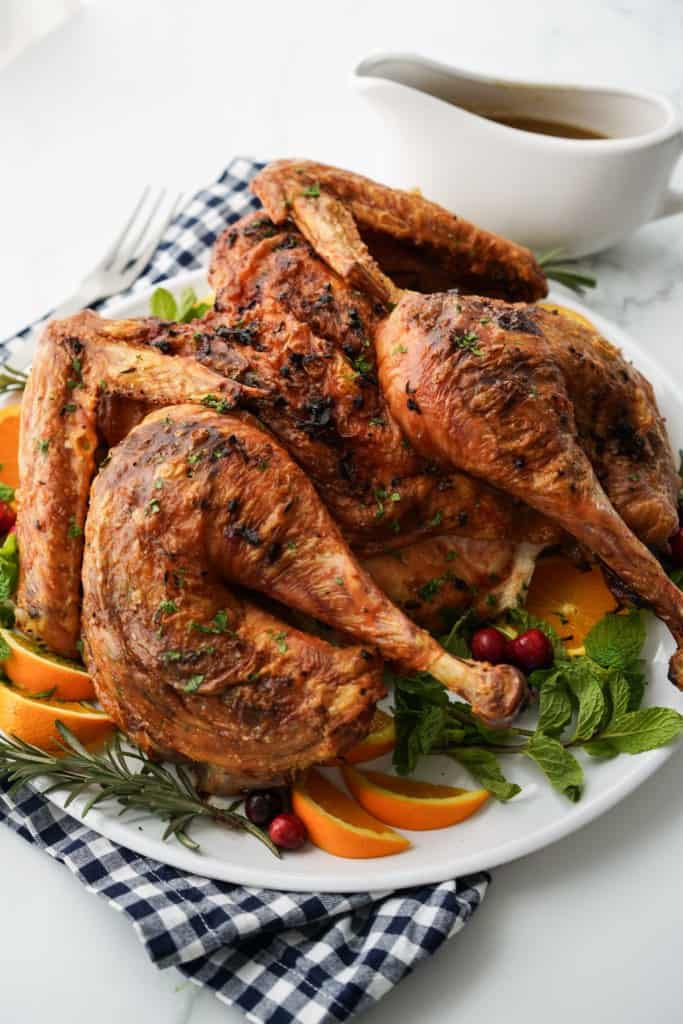
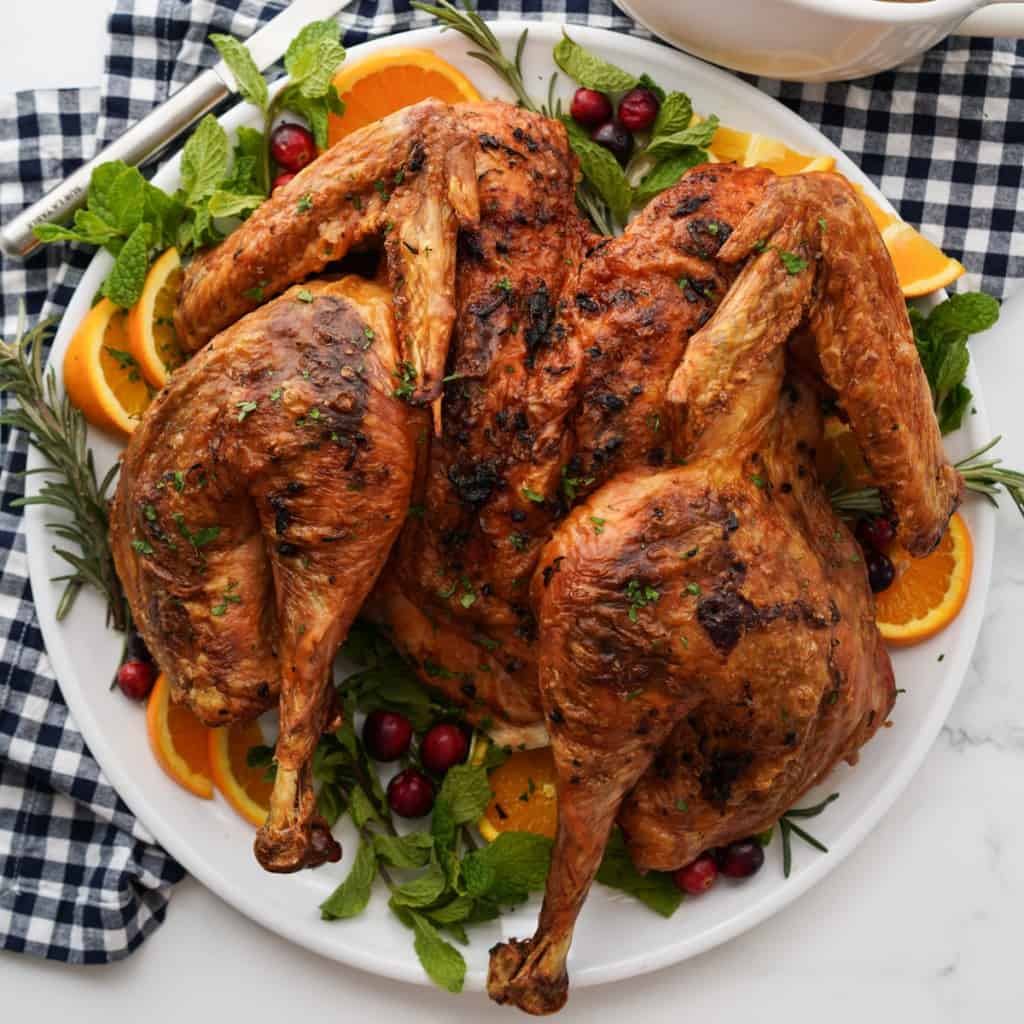
When the turkey is done, transfer it to a serving platter or cutting board so it stops cooking in the hot pan. Let it rest for 10 to 15 minutes before carving. Resting gives the juices time to settle back into the meat instead of running out onto the board when you slice, which means juicier turkey. If you want to keep it warm, loosely tent it with foil, but don’t wrap it tightly or the steam can soften that crispy skin.
While the turkey rests, make the gravy. Discard the herbs and veggies on the roasting pan and reserve the pan drippings (lots of incredible flavors in here!). You may want to use a colander to get just the drippings into a pot. Prepare gravy using my simple gravy recipe and the turkey fat drippings.
Carve spatchcocked turkey and serve with cranberry sauce or cranberry relish in addition to that delicious gravy!
How Long To Cook A Spatchcocked Turkey
Cooking time for a spatchcocked turkey varies by turkey size, starting temperature, and your oven. A turkey that’s still very cold in the middle takes longer, and ovens can run hotter or cooler than the dial says. Here is a rough guide for roasting at 400℉, based on about 8 to 9 minutes per pound:
- 8-pound turkey: About 65 to 75 minutes.
- 10-pound turkey: About 80 to 90 minutes.
- 12-pound turkey: About 95 to 110 minutes.
Treat these as estimates, not a deadline. When you roast spatchcocked turkey, the clock is only a guide, and an instant-read thermometer is the only reliable way to know when it’s done. My doneness temperature is 165℉ in the thickest part of the breast, with the innermost part of the thigh also reading 165℉ or higher. After that, the turkey needs to rest before carving so the juices stay in the meat.
How To Carve Spatchcocked Turkey
Because the backbone is already gone, a spatchcocked turkey is easier to carve than a traditional whole bird. Move the rested turkey to a big cutting board and use a sharp chef’s knife. Here’s an easy order to follow:
Legs: Pull one leg away from the body and cut through the skin where the leg meets the breast. Bend the leg back until the joint pops, then cut through the joint to remove the whole leg. Repeat on the other side.
Thighs: Set each leg skin-side down and find the joint between the drumstick and the thigh. Cut straight through it to separate the two. Serve the thighs whole or slice the meat off the bone.
Wings: Pull each one away from the breast and cut through the joint where it attaches.
Breast: Run your knife down along one side of the breastbone to lift off the whole breast half, then slice it crosswise against the grain into thick pieces. Repeat with the other half.
Arrange the carved turkey on a platter and spoon a little of the pan drippings over the top to keep it moist.
Make Ahead, Storage, And Freezing
A few parts of this recipe can be done ahead, which makes a busy Thanksgiving day feel much calmer.
Compound butter: Mix the butter, garlic, herbs, salt, and pepper up to 3 days ahead and keep it covered in the refrigerator. Let it soften at room temperature so it spreads easily.
Vegetables: Chop the carrots, celery, and onions a day ahead and store them in an airtight container in the fridge.
Spatchcocking: You can remove the backbone and flatten the turkey a day ahead, then keep it in the fridge until you’re ready to brine.
Thawing: Start thawing a frozen turkey in the refrigerator well in advance, allowing 24 hours for every 5 pounds.
Roast day: For the crispiest skin, roast the turkey on the day you plan to serve it.
Storage: Refrigerate carved turkey within 2 hours of cooking, in airtight containers, for up to 3 to 4 days. Spoon a little pan drippings or gravy over the meat to keep it from drying out.
Freezer: Freeze leftover carved turkey in freezer bags or airtight containers, pressing out as much air as you can, for up to 3 months for the best quality. Thaw overnight in the fridge before reheating.
Reheating: Reheat covered with foil in a 325℉ oven, with a splash of broth or pan drippings, until warmed through to 165℉.
Leftover ideas: Put that extra turkey to work in Turkey Cranberry Salad or Turkey Stew.
Tips and Tricks
- Use sharp kitchen shears: This will make that process of carving out the backbone much smoother.
- Just use a sheet pan: No need to get an expensive roasting pan to cook your spatchcocked turkey, simply use a sturdy half sheet pan.
- Defrost frozen turkey ahead of time: Frozen turkey needs to be completely defrosted in the refrigerator before preparing it. Defrost for 24 hours for every 5 pounds of turkey.
- Do not brine for too long: If you do want to brine for a long time (over 6 hours), you may want to reduce the amount of salt used so that your turkey does not get overly salty. The 1/4 cup of salt suggested for brining is for a 10-12 lbs turkey for a 4 hour brine.
- Adjust for the size of the turkey: Cook time and the amount of butter mixture used will vary depending on the size of the turkey. The measurements in the recipe card are for a 10-12 lbs bird, so adjust accordingly. For roasting at 400℉, bake the turkey for 8-9 minutes per pound, but start checking early because the starting temperature and your oven can change the time. Note that the larger the turkey, the harder it is to cut the backbone.
- Use fresh herbs: For the best flavor, use fresh herbs in the compound butter whenever possible.
- Dry the turkey: Pat the turkey dry with paper towels before seasoning to help achieve a crispy skin.
- Season evenly: Apply the seasonings and compound butter both under the skin and on top for maximum flavor.
- Use a spoon to release the skin: To apply the herb butter mixture under the skin, use a spoon to gently separate the skin from the flesh.
- Do NOT overcook turkey: The goal is to get the turkey fully cooked (the thickest part of the breast reaching 165℉ when measured using an instant read meat thermometer, and the innermost part of the thigh reading 165℉ or higher, avoiding the bone) and remove it from the oven promptly. This ensures the turkey comes out juicy and NOT dry. The dark meat will probably be done first, so as soon as the breast is done, pull the turkey to avoid overcooking the rest.
- Rest the turkey: Let the turkey rest for 10 to 15 minutes after removing it from the oven so the juices can redistribute. Skipping this step is how you end up with a puddle on the cutting board instead of juicy meat.
- Tuck wing tips: Tuck the wing tips under the turkey breasts to prevent them from burning during roasting.
- Save the drippings: Make gravy with the flavorful drippings from the roasted turkey to accompany the dish – do not let those drippings go to waste!
Frequently Asked Questions
“Spatchcocking” refers to a method of preparing poultry, in which the backbone is removed so that the bird lays flat as it cooks, resulting in faster cooking times, crispier skin, and even doneness.
For every 5 pounds of turkey, you will need to defrost it for 24 hours in the fridge
Yes, spatchcocking reduces the cooking time because it allows the turkey to lay flat, which ensures a quicker and more even roast.
I like to do a quick 4 hour brine to really flavor parts of the turkey that can be bland (such as the turkey breast). I find a quick brine makes the turkey much tastier.
The breast sits on top and gets the most direct heat, and the butter helps it brown fast. If it’s turning deep golden before your thermometer says it’s done, loosely tent the breast with a piece of foil and keep roasting. Next time, try moving the pan to a lower rack. An oven thermometer can also tell you if your oven runs hotter than the dial says.
Moisture is the enemy of crispy skin. Pat the turkey really dry, dry brine it so the salt pulls moisture out of the skin, and roast it uncovered at 400℉. Also avoid tightly covering the turkey while it rests, since trapped steam softens the skin. If the skin is still pale when the turkey is done, you can crisp it for a minute or two under the broiler, watching closely so it doesn’t burn.
Because a spatchcocked turkey lies flat, it cooks in less time than a traditional whole bird, so it often finishes sooner than you might expect. Turkey size, how cold the center is when it goes in, and your oven’s actual temperature all change the timing, and opening the oven door often can slow things down. Start checking early with an instant-read thermometer and go by the temperature (165℉ in the thickest part of the breast), not the clock.
A sheet pan is open and shallow, so drippings can scorch at 400℉, especially if the vegetables are cut thin. If you smell burning or see the drippings getting dark, carefully pour a little warm broth or water onto the vegetables (not over the turkey skin) and keep roasting. Piling the vegetables in a thicker layer helps next time. If the drippings taste bitter or scorched, skip them and make your gravy from broth instead.
ENJOYED THIS RECIPE? Tell us what you think by leaving a rating and review below! 🤍
More Holiday Recipes
- Cheesy Mashed Potatoes
- Bacon Green bean Casserole
- Pineapple Baked Ham
- Fried Apples (Caramelized Apples)
- Roasted Broccolini
- Caramelized Sweet Potato Halves
- Cheese Stuffed Dinner Rolls
Spatchcocked Turkey
Equipment
- Kitchen shears
- Chef's knife
- Big cutting board
Ingredients
Turkey
- 8-12 lb whole turkey
- ¼ cup salt for brine
- 3-4 carrots chopped
- 3-4 stalks celery chopped
- 2 onions quartered
- 2-3 sprigs fresh rosemary
- 2-3 sprigs fresh thyme
Compound Butter
- 10 tbsp unsalted butter softened
- 5 cloves garlic minced
- 2 sprigs fresh rosemary tough stems removed
- 3-4 sprigs fresh thyme tough stems removed
- 2 tsp salt
- 1 tsp black pepper
Instructions
- Prepare the bird: Remove the neck and the bag of giblets from the cavity of a fully defrosted turkey. Use a paper towel to pat dry the turkey.
- Spatchcock the turkey: With its breast-side down, locate the backbone. Using a sturdy pair of kitchen shears, cut along one side of the backbone, then cut down the other side. Discard backbone. Flip the turkey over. Press to break the wish bone so the turkey lies flat.
- Brine the turkey: Use a spoon to loosen the skin. Be careful not to break or remove the skin. Generously salt turkey all over making sure to get some of the salt under the skin as well as all of the outside. Let sit with this dry brine for 4 hours.
- Make the compound butter: In a small bowl, add softened butter, garlic, thyme, rosemary, salt, and pepper. Mix to fully combine.
- Prepare a sheet pan by placing chopped carrots, celery, and onions on the pan. Place a few sprigs of fresh thyme and rosemary.
- After 4 hours, preheat oven to 400℉.
- Dress the turkey: Smear the compound butter all over the turkey making sure to get some under the skin.
- Place the buttered turkey on the top of the chopped veggies and fresh herbs on the prepared pan.
- Place in the preheated oven and roast about 8-9 minutes for every pound (roughly 80-90 minutes for a 10 pound turkey). Time varies with the size of the turkey, its starting temperature, and your oven, so start checking early.
- Check the temperature: Insert an instant-read thermometer into the thickest part of the breast and the innermost part of the thigh, avoiding the bone. Remove the turkey promptly once the thickest part of the breast reaches 165℉ (the thigh should read 165℉ or higher too). Avoid overcooking so the turkey stays juicy and moist.
- Rest the turkey: Transfer the turkey to a serving platter and let it rest for 10-15 minutes before carving, so the juices can redistribute. Loosely tent with foil if you like. Use the pan juices to make a gravy if you desire to do so.
- Carve, serve and enjoy!
Recipe Notes
- Defrost time guide: Frozen turkey needs to be completely defrosted in the refrigerator days ahead of time. Defrost 24 hours for every 5 pounds of turkey.
- Turkey cook time guide: For roasting at 400℉, bake turkey for 8-9 minutes per pound or until internal temperature reaches 165℉.
- Quick brine: Reduce the amount of salt use if you are brining turkey for more than 6 hours. The 1/4 cup of salt suggested for brining is for a 10-12 lbs turkey for a 4 hour brine.
- Do NOT overcook turkey – The goal is to get the turkey fully cooked (thickest part of the breast reaching 165℉ when measured using an instant read meat thermometer) and removing turkey from oven promptly. This is to ensure turkey comes out juicy and NOT dry. Dark meat, thighs and wings will be done first, so as soon as the breast is done, you’ll want to pull it to avoid overcooking other parts of the meat
- Resting: Let the turkey rest 10-15 minutes before carving. This lets the juices redistribute so the meat stays juicy.
- Make ahead and storage: The compound butter can be made up to 3 days ahead and the veggies chopped a day ahead. Refrigerate leftovers for up to 3-4 days, or freeze for up to 3 months.