Our favorite easy dinner method: crunchy baked chicken tacos. This is a ridiculously quick and delicious oven-baked taco recipe using rotisserie chicken, refried beans and lots of melted cheese, all wrapped together in a crispy flour tortilla.
These crispy chicken tacos are perfect for busy weeknights and makes great leftovers. It also requires minimal prep and makes for yummy party food and game day food.
If you are in the mood for beef instead of chicken, try these Crispy Baked Beef Tacos instead! If you like smoky chipotle peppers, try my Chipotle Chicken Tacos – which is basically this baked chicken taco recipe with chipotle flavored chicken! And if you rather roll up your tacos, try these Crispy Baked Chicken Taquitos! So many options! 😉
Crispy Oven Baked Rotisserie Chicken Tacos
If you are looking for the easiest way to make tacos for a crowd, baked chicken tacos is the way to go!
For this crispy chicken taco recipe, we are using Rotisserie chicken from the store so in other words, no standing by the skillet, cooking lots of taco meat in batches.
Instead, with 20 (or less!) minutes of prep time and 20 minutes of hands-off cooking time, you can have all the crispy baked chicken tacos done at the same time. Yep, I call that taco magic.
Whether it is taco Tuesday, hosting a party, or just a regular (busy) weeknight, make taco night fun, delicious and easy by baking these rotiserrie chicken tacos in the oven.
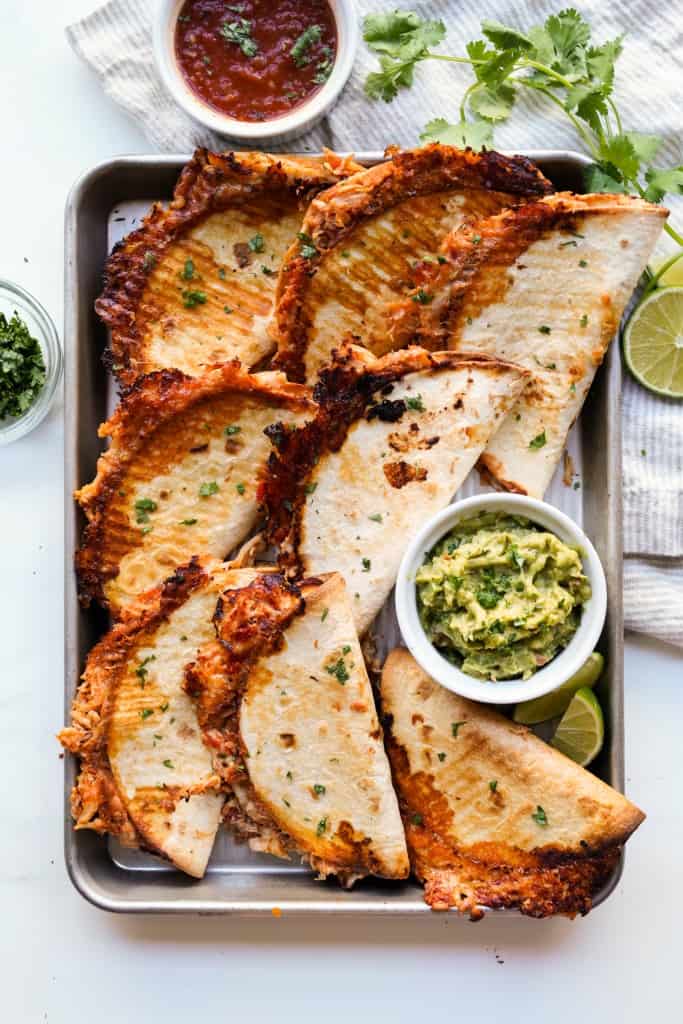
You’ll get nice crispy flour tortillas loaded with cheese, refried beans and seasoned shredded chicken. Serve with some salsa, queso and guacamole and you’ve got a tasty, tasty Mexican inspired dinner.
We love this baked chicken taco recipe because it is:
- easy – ready under 30 minutes!
- minimal dishes – minimal cleanup!
- regular, pantry-friendly ingredients – no complicated, hard-to-find ingredients. In fact, you may already have them in your pantry!
- Great flavors and textures– these crispy baked chicken tacos are loaded with refried beans, cheese and chicken that is seasoned with taco seasonings. I promise there’s no lack in flavor in these things! And that crunch! We love how it’s super crispy even though it’s oven baked (translation: not deep dried!)
Baked chicken tacos make some of the best leftovers, and they even make a great easy lunch that you can munch on at your desk. We’ve been known to eat it a lot standing up on the kitchen counter! 😉

Ingredients
We’ve formulated this baked chicken taco recipe to be easy – minimal ingredients (so all of them play an important role!) and massive flavors! You’ll need:
- Shredded rotisserie chicken – you can use other chicken but I find that the easiest and fastest way to do this is to use rotisserie chicken. Grab it from the store and shred it yourself. Or, you can get ready-shredded rotisserie chicken – yes, they exist! Or, you can throw raw chicken breasts into the slow cooker along with 1/4 cup of chicken broth, cook it for 4 hours on high.
- Rotel – This comes in a can and is a combination of tomato sauce and green chilies. It adds so much flavor to the shredded chicken filling for our baked chicken tacos. It comes in mild or hot so if you don’t like spicy, mild will be a much better choice. In a pinch, you can substitute with salsa as well.
- Taco seasoning – use store-bought packet or homemade taco seasoning.
- Monterey jack cheese – other soft cheeses that melts easily such as Colby jack, mild cheddar work as well. We will be using this shredded.
- Refried beans – a classic Mexican ingredient made with pinto beans – I get the canned version to use for this crispy chicken taco recipe. It’s a nice creamy texture, boast great flavor, and is packed with protein and high in fiber. They also serve as a glue to get the tortillas to stay close when baking,
- Flour tortillas – corn tortillas work as well! I do find that they break more easily in the oven though.
How to Bake Chicken Tacos in the Oven
Crispy baked chicken tacos is going to change your taco nights forever. Once you make tacos this way, you’ll never want to revisit your old ways.
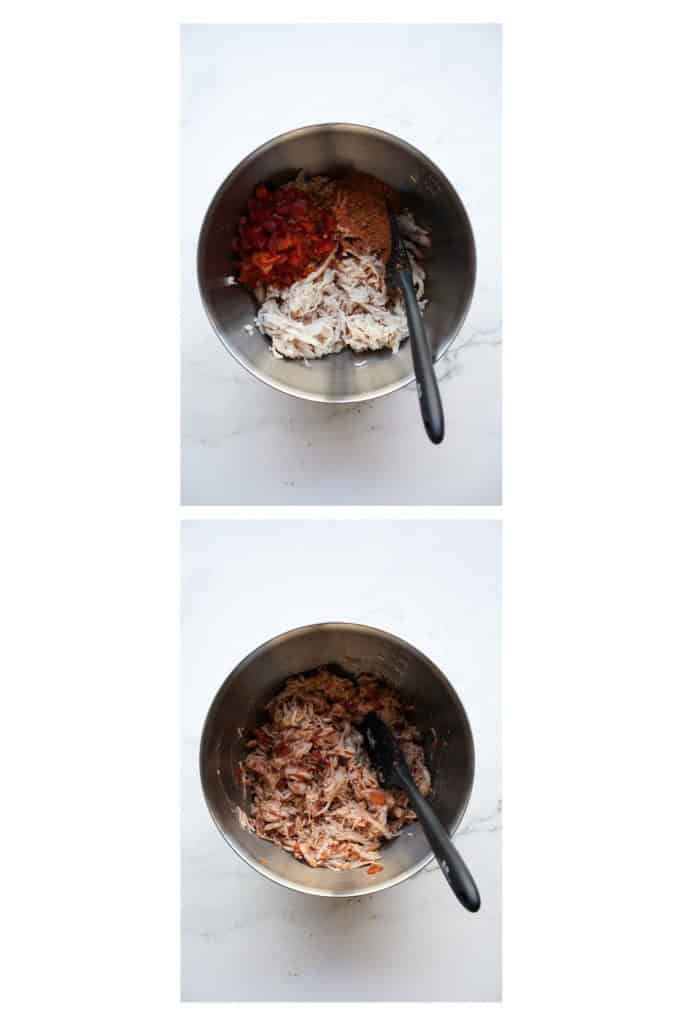
Prepare Rotisserie Chicken Filling
In a large mixing bowl, combine shredded rotisserie chicken, Rotel and taco seasoning together to make the chicken filling for the baked chicken tacos.
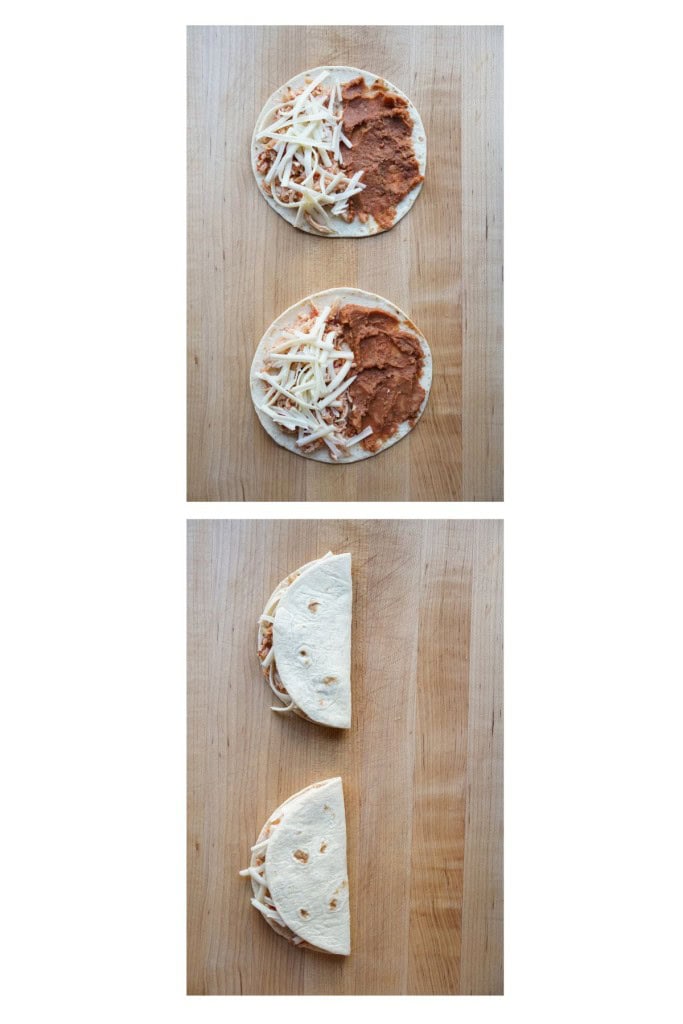
Assemble the tacos
Brush one side of the flour tortilla with cooking oil.
Flip tortilla over and spread ~ 1 tbsp of refried bean on one half of the tortilla. Spread ~ ¼ cup of the seasoned chicken to the other half of the tortilla.
Sprinkle cheese on top of the chicken. Then fold the tortilla over to make the taco.
Line the taco on half sheet baking sheet. Repeat until all tacos are prepared. You may need to use two half sheet cooking sheets in order to fit all of the tacos.
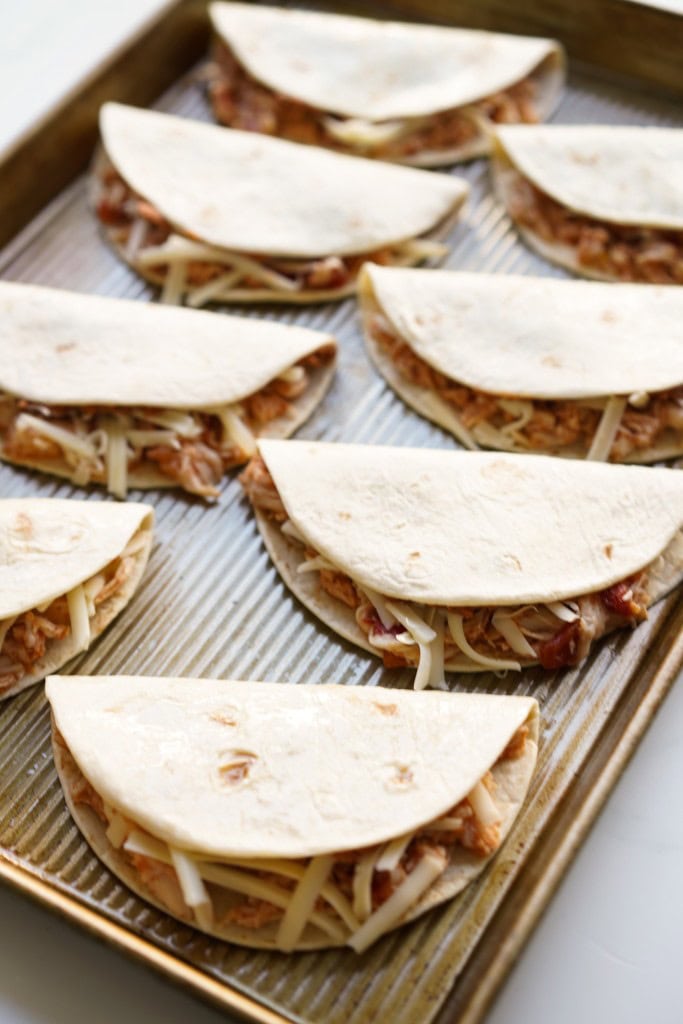
For this recipe, we used 6-inch flour tortillas, and it yielded ~15 tacos.
Oven bake chicken tacos: Oven bake at 425℉ for 10 minutes. Flip tacos and cook for another 10 minutes.
When baked chicken tacos are done in the oven, the filling will be nice and gooey, and the tortillas on the outside will be crispy. Yum!
Serve
Serve baked chicken tacos with your favorite garnishes.
Some of my favorites include:
- cilantro lime dressing – Briannas has one that I LOVE! (also what is pictured drizzled onto the taco in the second photograph!)
- avocados
- salsa
- jalapeños
- cilantro
- additional cheese or queso
Tons of flavor, gooey cheese and crispy tortilla. So much to love.

These baked chicken tacos are seriously addictive.
We’ve been known to eat this standing around the kitchen island because we cannot wait to load up our plates to devour this incredible crispy baked chicken tacos.
Storage and Leftovers
You can store the tacos (without garnishes) in an air tight container in the refrigerator for up to 3 days. Simply reheat in the toaster oven or oven to serve. You can reheat in the microwave but it will not be as crispy.
Tips and Tricks
- Don’t Overfill Tacos: To ensure your tortillas close easily and hold together once they’re baked, be careful not to overfill each taco.
- Line Baking Sheet: Line your baking sheet with parchment paper for easier cleanup and to prevent sticking.
- Use Rotisserie Chicken: This is a great shortcut when you’re in a hurry. Simply shred the meat, season it, and proceed to filling your tacos. Or better yet, buy pre-shred rotisserie chicken!
- Add Creamy Ingredients: Ingredients like refried beans, queso, or even a dollop of avocado or cream cheese can help add another layer of flavor and creaminess to your tacos.
- Flip Halfway Through: For evenly browned tacos with a nice crispy texture, flip them halfway through the baking time.
- Alternative Cooking Methods: If you’re doing a few tacos, consider using your air fryer for a faster cooking time and perhaps an even crispier finish.
Frequently Asked Questions
Yes! I find that corn tortillas crisp up a lot faster than flour tortillas. You will not need as long of a bake time – cook it for just 6-7 minutes on each side.
Add diced jalapeños or use spicy taco seasoning or hot sauce in the chicken mixture.
It’s best to add toppings like lettuce, avocado, or salsa after baking to maintain their freshness and avoid wilting.
– Generously brush with oil
– Flip halfway through when baking (especially if you’re using flour tortillas)
– Brush more oil if needed halfway through baking
– Bake for longer if needed
Yes, you can. The air fryer will give your tacos a crispy texture. Cook at about 375°F for 5-7 minutes or until heated through and golden brown.
Yes, you can freeze them, but I recommend freezing before baking for the best texture. Wrap each taco individually in plastic wrap and store in an airtight container.
ENJOYED THIS RECIPE? Tell us what you think by leaving a rating and review below! 🤍
More Taco Recipes

Baked Chicken Tacos
Equipment
Ingredients
- 3 cups rotissere chicken shredded
- 10 oz Rotel
- 1½ tbsp taco seasoning
- 15 oz refried beans
- 8 oz monterey jack cheese shredded
- 15 flour tortillas 6-inch
- 2 tbsp cooking oil
Instructions
- Preheat oven to 425℉.
- In a mixing bowl, mix shredded rotisserie chicken with Rotel and taco seasoning.
- Brush one side of the flour tortilla with cooking oil. Flip over so the greased side is at the bottom.
- Assemble the taco by spreading ~ 1 tbsp of refried bean on one half of the tortilla. Add ~ ¼ cup of the seasoned chicken to the other half of the tortilla. Sprinkle cheese on top of the chicken. Then fold the tortilla over to make the taco. Place on cooking sheet.
- Repeat until all tacos are prepared. You may need to use two cooking sheets in order to fit all of the tacos. This should yield about 15 tacos using the 6-inch tortillas.
- Place tacos into the preheated oven. Cook for 10 minutes. Flip tacos over and cook for another 10 minutes.
- Serve and enjoy!
Recipe Notes
- This recipe yields 15 tacos using 6-inch tortillas.
- Using corn tortillas instead of flour tortillas: Cook time will be slightly short – bake it for 6-7 minutes on each side.


Two words. So. Easy! I was looking for some new recipes, and this one caught my eye. It was tasty and easy to make. I love using rotisserie chicken in recipes because it’s so moist and flavorful. I will be adding this to my monthly rotation. Thanks!
Yay! Happy to hear that this came out well and you’ve added it to your monthly rotation!
A quick and tasty dinner! I served with store-bought salsa and guacamole and it was a big hit!
Sounds like a tasty dinner indeed! Thanks for sharing!
what is that sauce you mentioned in your reel? cilantro lime something. Where is that recipe?
It’s Briannas’s Cilantro Lime Dressing!
I would love your cilantro lime recipe
is the sauce from the video store bought or home made? I didn’t see a recipe for the green sauce drizzled at the end. Could you please share that tidbit as well? looks super tasty!!
Thanks Nicole! The sauce is Briannas’ Cilantro Lime Dressing.
ty
You’re so welcome! I hope you loved them!
Love this, will make lots of times.
I’m so glad to hear that, Karen! Thanks for sharing <3
My whole family loved these! We got two meals out of them. I used all the meat from one rotisserie chicken and a whole packet of cholula taco seasoning as well as the rotel, beans and cheese. They cooked perfectly at ten minutes each side and warmed up nicely for the second meal. We topped them with guacamole, sour cream, cilantro and salsa. It was easy to hold and eat too. A winner!
YUM! Thank you for sharing! Love that it went so well!
I made these tonight and they were delicious and easy to make. Thanks for sharing the recipe.
So glad to hear that they turned out so well!
this is easy and healthy – you could also vary the fillings, so folks could choose white or dark meat, less or more cheese, less or more spicy veg,. etc
Yes!! It’s SO easy to customize this and make it your very own! Thanks for sharing, Judith! <3
Absolutely delicious and so easy to make!
Any tips on how to cook from frozen?
So glad you enjoyed it! You can bake it or air fry it straight from frozen. For baking, try baking for 20 minutes at 350 or until it is warmed all the way through. Try air frying at 360 for 8-10 minutes or until warmed all the way through. Hope that helps! Please share what worked best for you 🙂
It’s a huge hit in my church family!! I make this now for 2 couples once a week and they absolutely want these and nothing else! we also eat this several times a week!! So delicious! Thank you for sharing this!!
Thanks for sharing, Heather! I’m thrilled to hear that it’s well loved! 🙂