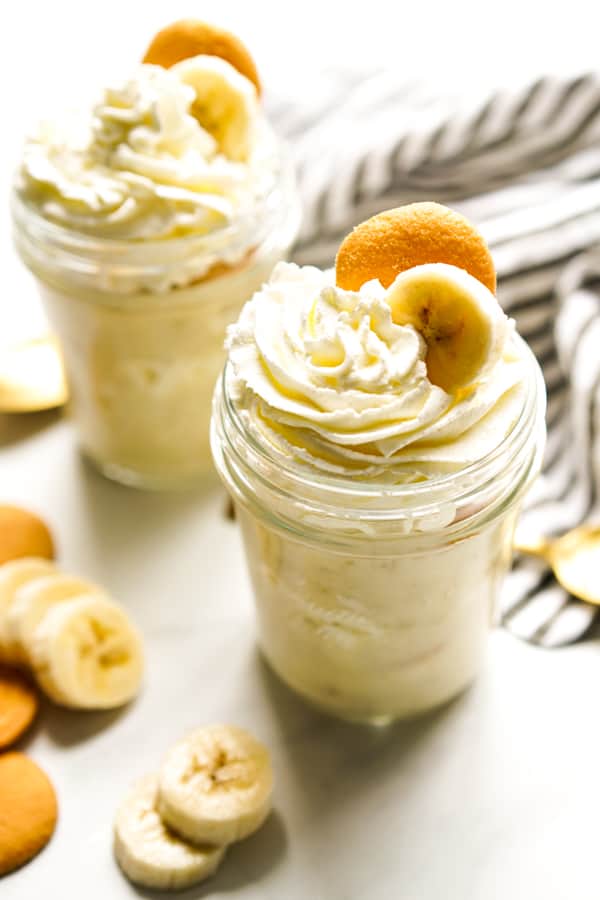
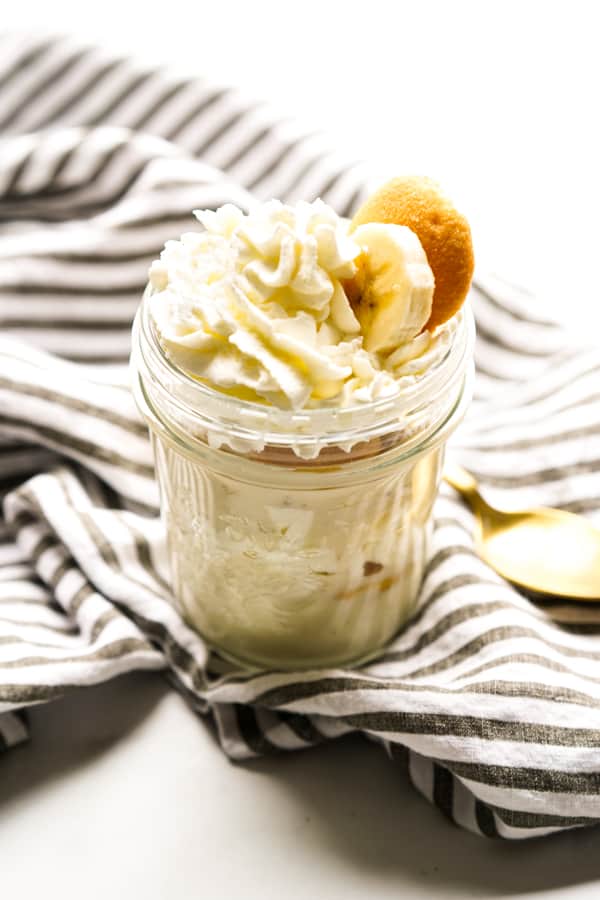
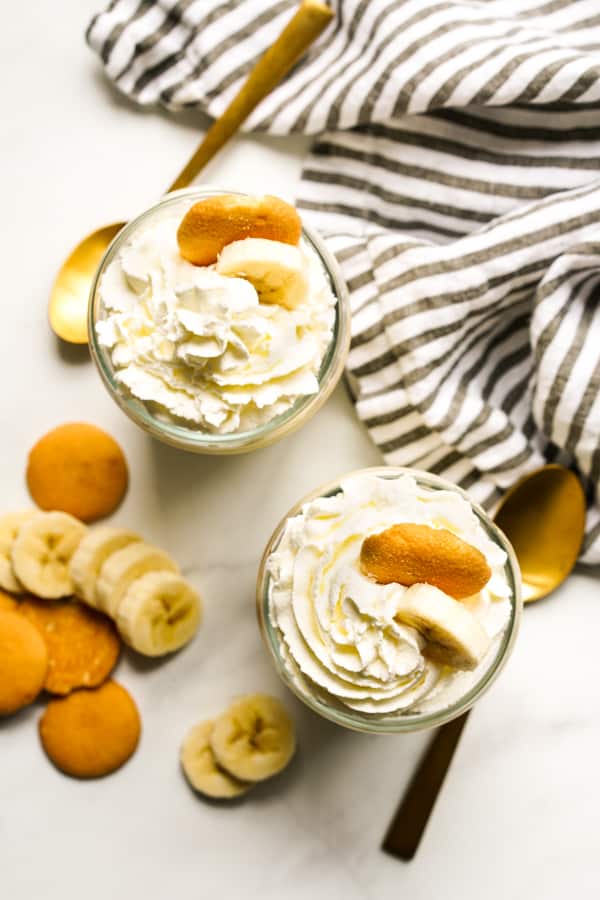
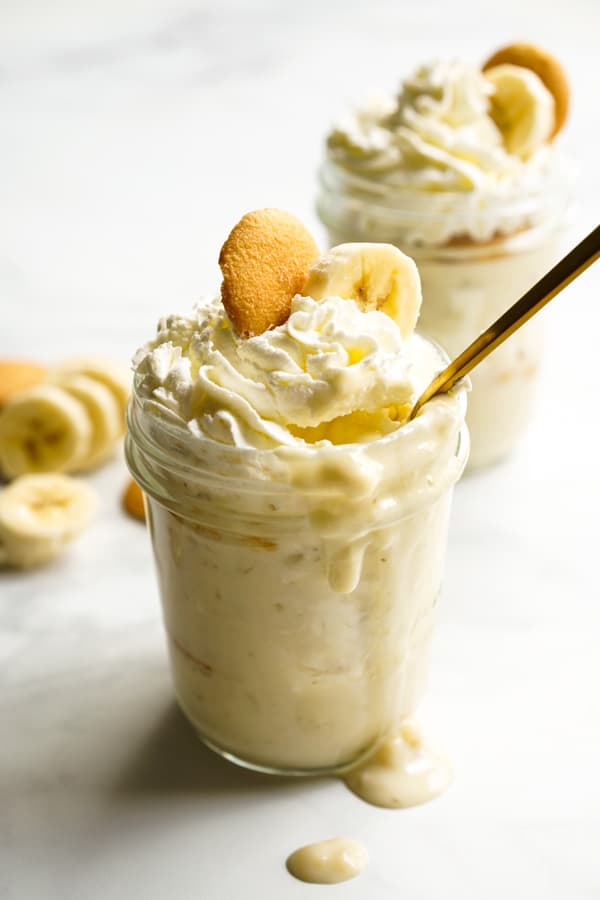
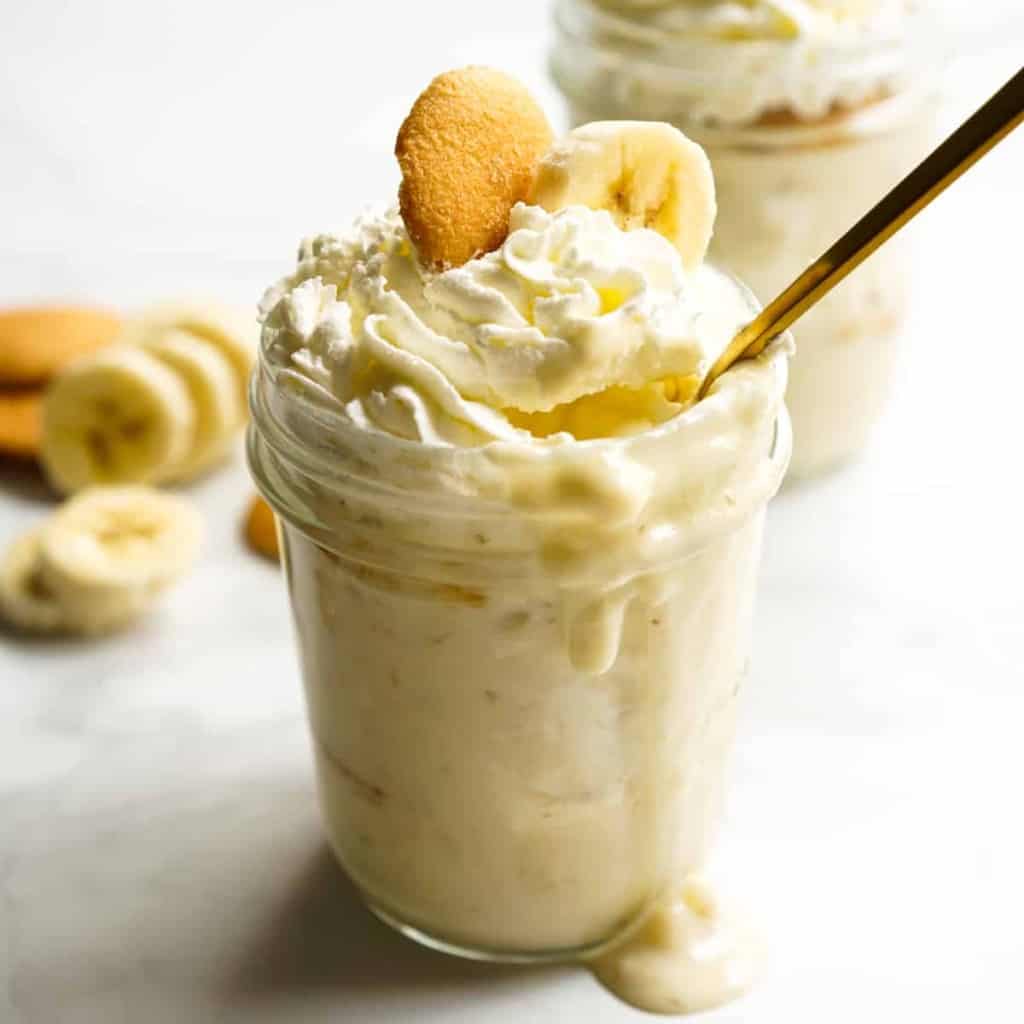
Let us take a moment and appreciate the beauty and yumminess of this glorious Mason Jar Banana Pudding…
The creamy banana flavored pudding combined with fresh whipped cream, Nilla wafers and chunks of bananas in every bite is all the summer decadence I need in my life.
Why mason jars? Well, these Banana Pudding Jars are the perfect single serving treat when you desperately need some sugar in your life but don’t want a whole dish of it sitting in the fridge tempting you and making you regret making it in the first place.
Yumminess and guiltless (well, semi guiltless…) is what we are striving for today…
You are welcome!
Each Banana Pudding Jar is layered with all the banana pudding essentials and made without instant pudding mix. Instead we are using fresh ingredients to make the pudding from scratch – which is totally doable (no worries I’m guiding you through every step of the way) and most importantly, way more delicious.
These Individual Banana Pudding are also perfect for entertaining, showers, and picnics. It looks all cutesy, artsy and Pinterest-inspired…with very little efforts!
This is my tried and true banana pudding recipe. One I make over and over again. And cannot wait to overeat it all summer long!
What I love most about this recipe is that mashed bananas are incorporated into the pudding itself, instead of just having pieces of banana layered between vanilla flavored pudding. So it’s basically vanilla-banana flavored pudding, and let me tell you, once you go there, you will never want to go back!
Let’s Make It!
How to make pudding
The part I’m going to spend the most time on is how to make the actual pudding itself, because once you get that down, it’s just all about layering a cute jar.
Making pudding can feel intimidating…but don’t be intimidated! It’s really pretty straight forward once we take note of a few important steps and follow the directions carefully.
And you bet I’ll provide everything you need to get this pudding-making skill under your belt!
First, start by whisking eggs into a fairly large bowl and setting it aside.
Then bring these ingredients to a boil under medium heat in a pot:
- Flour
- Sugar
- Salt
- Milk
- Vanilla extract
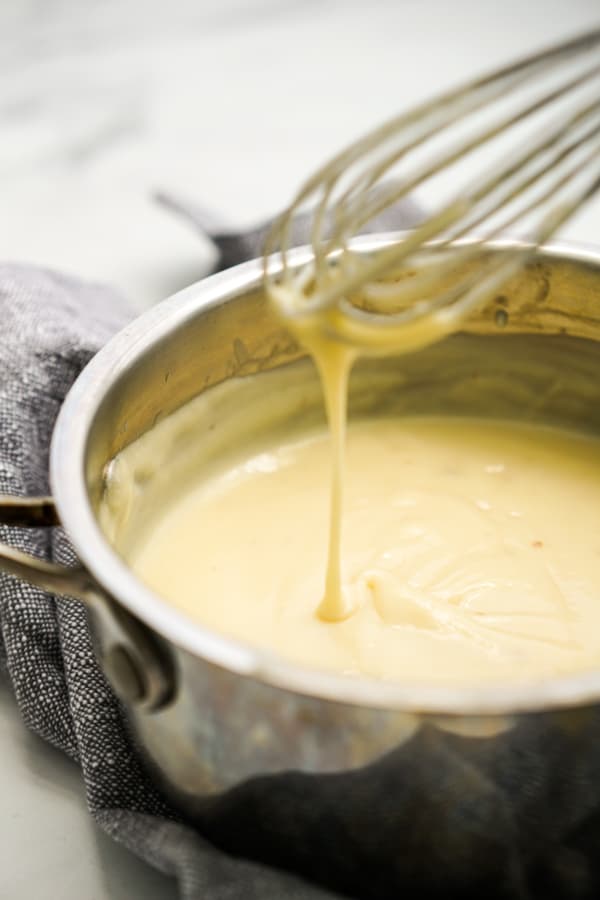
Be sure to use a whisk to whisk continuously throughout this whole process, and lower heat once it comes to a boil. Whisking continuously is so important to prevent pudding from hardening and burning at the bottom of the pot because there’s sugar in the mixture, and also to smooth out the lumps and completely dissolve the flour.
So in other words, when you make the pudding, you want to be by the stove whisking non-stop!
The good news is, it doesn’t take very long for the pudding to thicken. Once it thickens, remove from heat.
Next, we will slowly incorporate pudding mixture into that large bowl of egg mixture a few tablespoons at a time. Caution: do not dump pudding mixture in all at once! We are trying to avoid scrambled eggs. As you add pudding mixture into egg mixture, use the whisk to whisk it continuously until everything is incorporated.
Finally, we bring the mixture back into the pot, heat it under medium heat until it comes to a boil (And yes – still keep stirring/whisking), then remove from heat, add sweetened condensed milk and one mashed ripe banana into the mixture and give it a good stir.
Transfer mixture into a separate container so that it cools for 30 minutes. Because the pot is probably still hot, leaving the pudding in the pot will slow down the cooling process.
After that, refrigerate pudding for at least 3-4 hours. I typically make the pudding ahead and leave it in the refrigerator overnight because I like my pudding super cold.
Important Tips for Making Pudding
Basically, here are two very important things to note while making the pudding:
- Whisk continuously. Anytime the pudding is in the pot and heated, whisk away! This is to prevent the pudding from sticking and burning.
- Do not add pudding mixture into egg mixture all at once, and whisk egg mixture continuously when adding pudding mixture to it. This will help avoid scrambled eggs from forming! Because nobody wants scrambled eggs in their banana pudding… 😉
Whipped Cream
If you are making whipped cream from scratch, this is a good time to make it. If that feels like a lot, no problemo! Get a box of cool whip and use that instead!
Homemade whipped cream is basically whisking together heavy whipping cream and sugar until it thickens. Whisk it on high speed using a hand held mixer or stand mixer (p/s: using a stand mixer makes this SUCH a breeze) for a few minutes. As much as store-bought cool whip does it job in these Mason Jar Banana Pudding, homemade whipped cream takes any banana pudding to the next level.
Oh the Layers…
And then comes the real fun part…layering!
I use ~10oz jars for these, but you can use any size jars, cups, or even bowls! Make as much or as little as you want! It is super versatile.
Note: When using 10oz jars, I get about four servings (sometimes three if I go overboard) of these Banana Pudding Jars.
Here’s how I layer them:
- Banana pudding (bottom)
- Slices of bananas
- Nilla wafers
- Whipped cream (top)
For these 10oz jars, I have two layers of each of the above, but you can always add more layers or just do one layer.
Once everything is layered, top with a slice of banana and a piece of Nilla wafer.
I like to let it sir for ~30 minutes in the fridge so that Nilla wafers soften. And then dig in, savor, and enjoy every bite! A.k.a. the BEST part. 💛
Tips and Tricks
- Use ripe bananas – it makes the pudding more flavorful!
- Use smaller jars and make more individual servings from this recipe.
- Let Nilla wafers sit in the layered Mason Jar Banana Pudding for at least 30 minutes so that they soften.
- Top with caramel to further jazz this up!
- Looking to prepare this ahead of time? Cook pudding, make whipped cream and store them separately in an airtight container in the refrigerator for up to three days. Only layer them in mason jars a few hours before serving.
More Dessert Recipes
- Individual Mini Peach Clobber
- Mini Chocolate Chess Pie
- No Bake Cheesecake Bites
- Banana and Date Muffins
- Mango Crumb Bars
- Blueberry Crumb Bars
- Mango Sweet Sticky Rice
- Banana Cake in the Mug (by Savor the Best)
ENJOYED THIS RECIPE? Tell us what you think by leaving a rating and review below! 🤍
Mason Jar Banana Pudding
Ingredients
- 2 large eggs
- 3 tbsp all purpose flour
- 1/4 cup granulated sugar
- a pinch salt
- 1 1/2 cups 2% milk
- 1 tsp vanilla extract
- 2 tbsp sweetened condensed milk
- 1 ripe banana mashed
- 1 ripe banana cut into slices
- 1 cup Nilla wafers
Homemade Whipped Cream
- 2 cups heavy whipping cream
- 2 tbsp granulated sugar
Instructions
- Whisk eggs into a large bowl and set it aside.
- Bring flour, sugar, salt, milk, and vanilla extract to a pot and boil under medium heat. Whisk continuously throughout this whole time to prevent mixture from browning and sticking to the bottom of the pot. Once it comes to a boil, lower heat to medium low and cook until it reaches a slightly thicker consistency. Don't forget to whisk continuously! Remove from heat when it is done.
- Slowly add pudding mixture a few tablespoons at a time into egg mixture, while using the other hand to whisk the egg mixture continuously when combining the two mixtures.
- Once the two mixtures are combine, pour it back into the pot and heat under medium heat until mixture comes to a boil. Whisk continuously!
- Turn off heat, add mashed bananas and sweetened condense milk to pudding. Mix to combine.
- Transfer pudding to a separate container, let it cool in room temperature for 30 minutes, then refrigerate for at least 3-4 hours until pudding is cold.
- To make homemade whipped cream, whisk together heavy whipping cream and sugar under high speed using a stand mixer or hand held mixture, until whipped cream is thickened and no longer in liquid form. This will take at least a few minutes. Store whipped cream in refrigerator until pudding is cold. Alternatively, use store-bought cool whip and skip the homemade whipped cream step!
- Layer pudding, sliced bananas, Nilla wafers, whipped cream/ cool whip onto a jar, bowl, or mug. Repeat to add another layer. Then top with a slice of banana and Nilla wafer.
- Repeat Step 8 to fill up three more jars.
- Let pudding sit for ~30 minutes so that Nilla wafers soften. Then serve and enjoy!


This is comfort food that makes me so happy. It’s one of those desserts that brings back childhood memories isn’t it
Definitely 🙂 Thanks so much…it’s pretty amazing!!
sounds great! Does it set up solid enough to use as banana cream pie filling?
I have no tried it as a cream pie before but I think it should be fine. Please let me know how it goes!